Drawing Course by Lillian Gray
Lesson 13 I How to Draw a Nose
Mar
Watch the lesson for free on our YouTube channel
Free Drawing Course by artist Lillian Gray
This is a video and blog series teaching the fundamentals of drawing in an easy to understand way. The series consists of 15 lessons presented by artist Lillian Gray.
Introduction
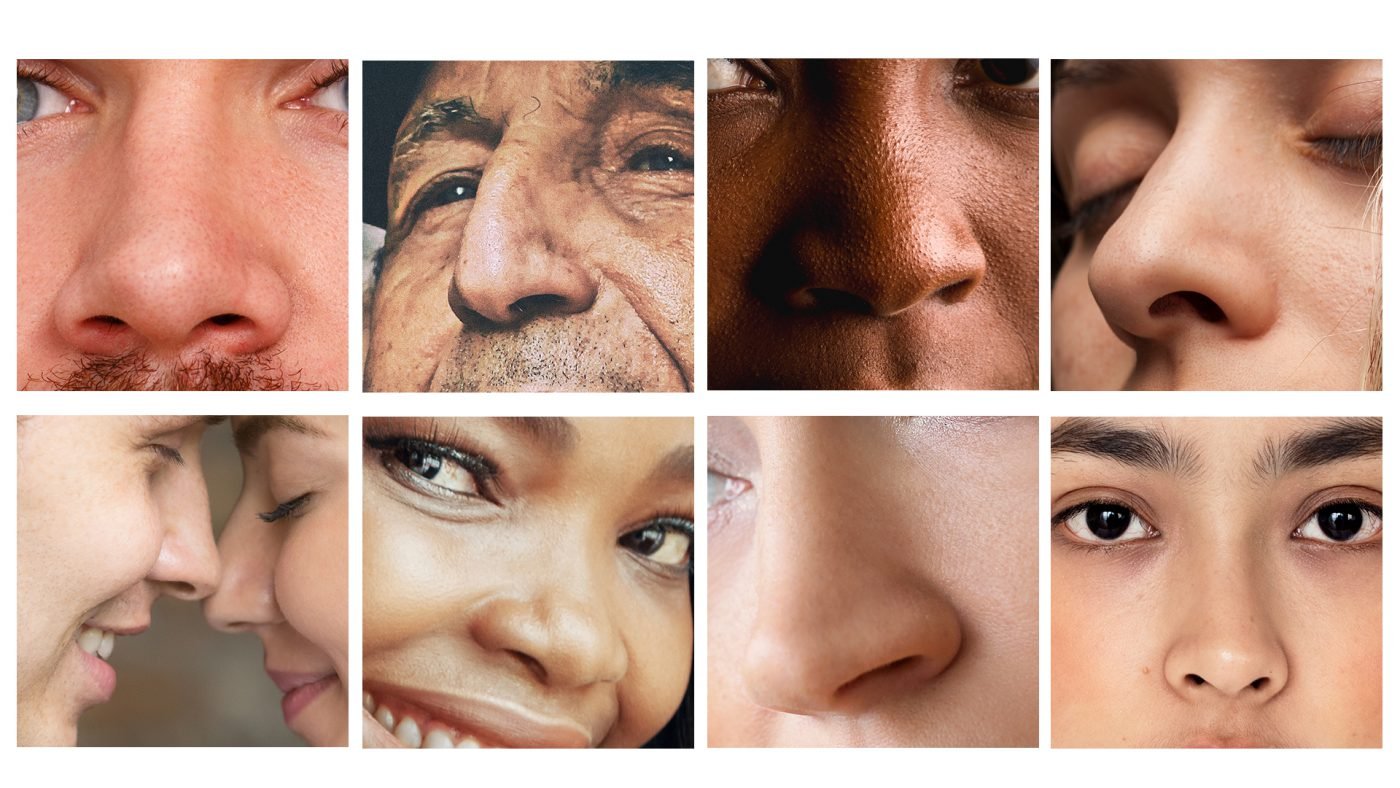
Noses come in many shapes and sizes, and when they are prominent, they get noticed very quickly. But people get less excited about the nose than the eyes because it is much less critical to communicate emotion and facial expressions. The nose tip is more mobile than the rest, contributing to feelings such as sneering, but even then it’s not the nose we pay most attention to, this makes the nose less intimidating to draw. On the other hand, it is more complicated than we might think, and we still need to understand its parts if we are to draw it convincingly. In this lesson we will teach you how to draw a nose in proportion and accurately.
Tips on drawing the nose
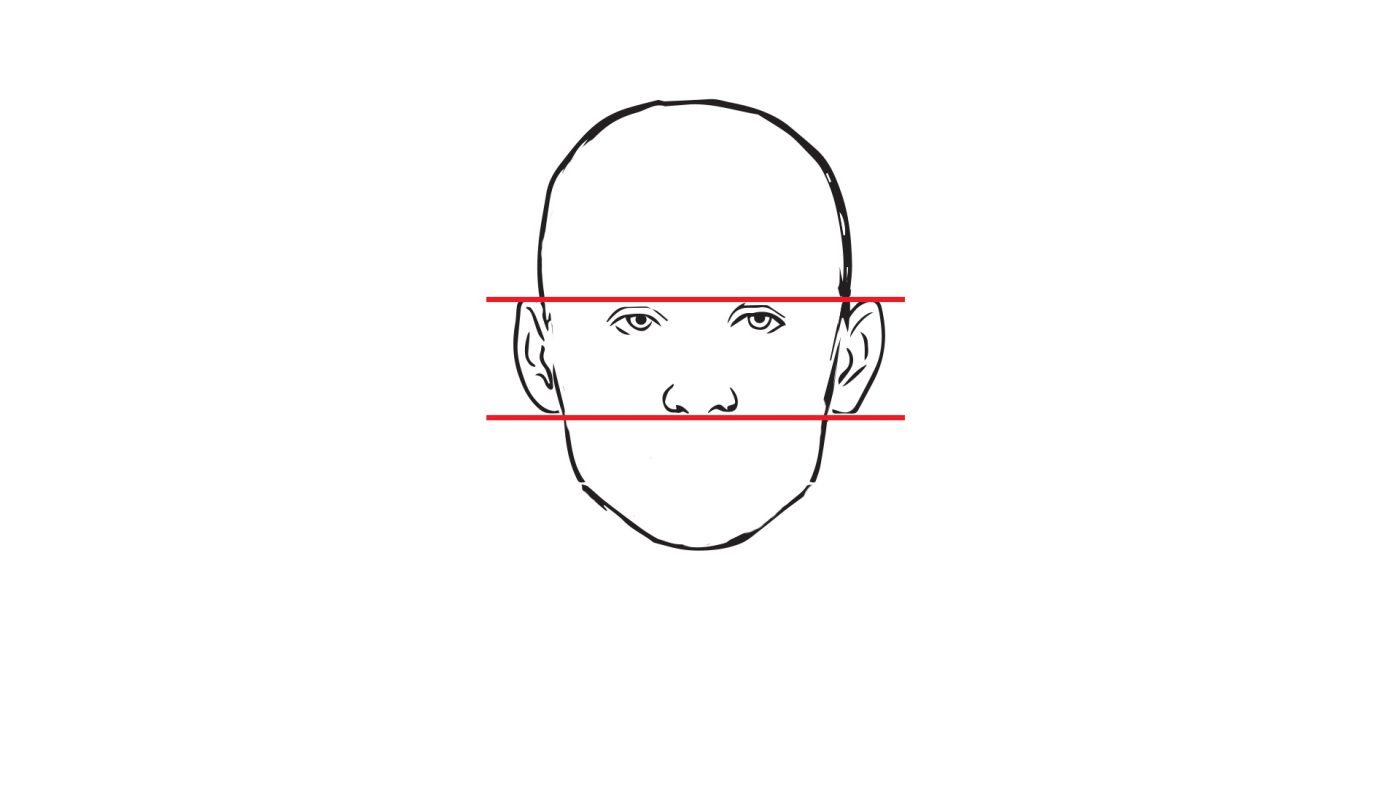
We think of people having long or short noses, but proportionally, i.e. from browline to nose line, most noses are much the same length. A decisive difference lies in the angle of the nose – a nose that turns up will look shorter than one that doesn’t. This is an easy guide on how to draw a nose in the correct place on the face.
Structure
Before you draw a nose you need to understand what it is.
The nose is a protruding structure of cartilage and fat built upon the bones of the face.
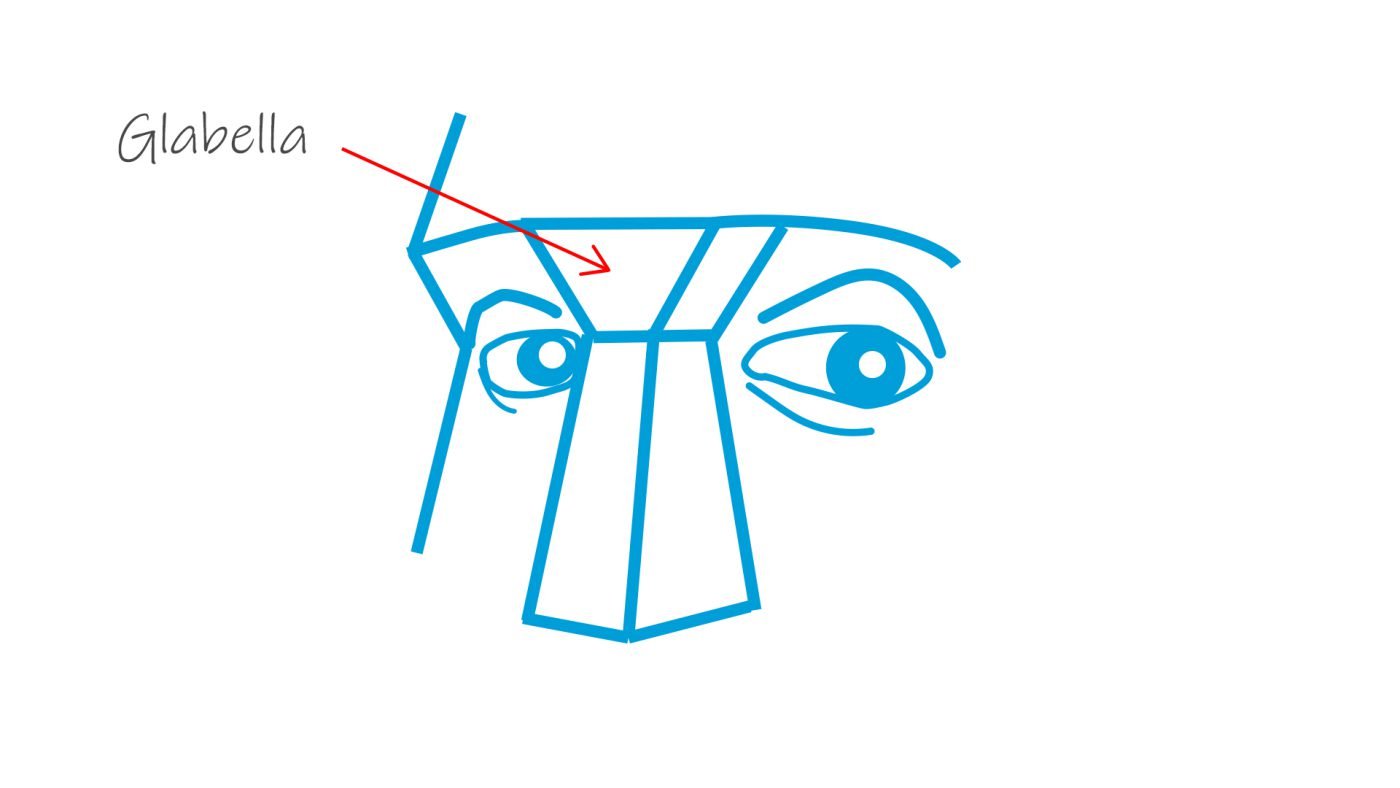
The glabella is triangular in shape found just above the nose bridge. It is the smooth part of the forehead above and between the eyebrows. It shows how the nose is connected to the face.


The Nose in Basic Shapes
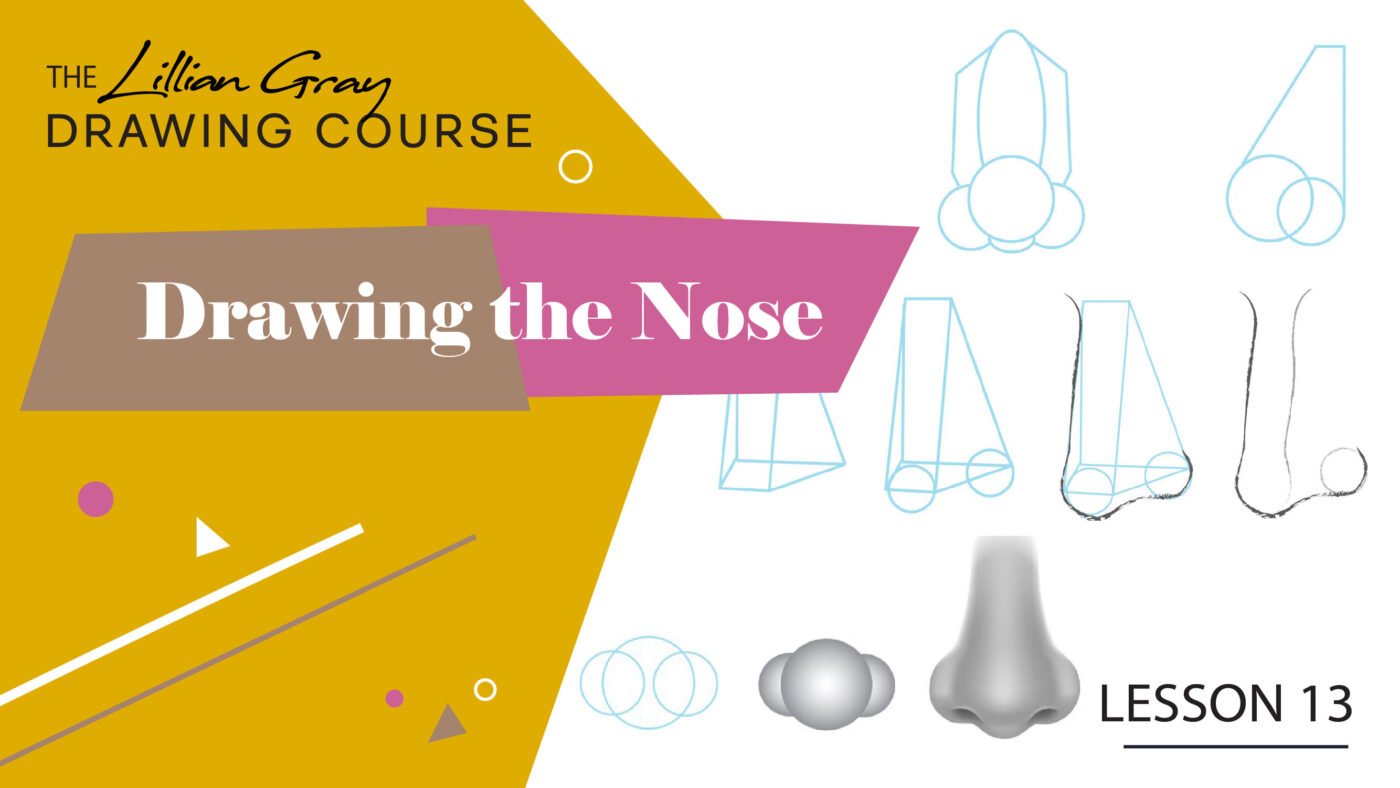
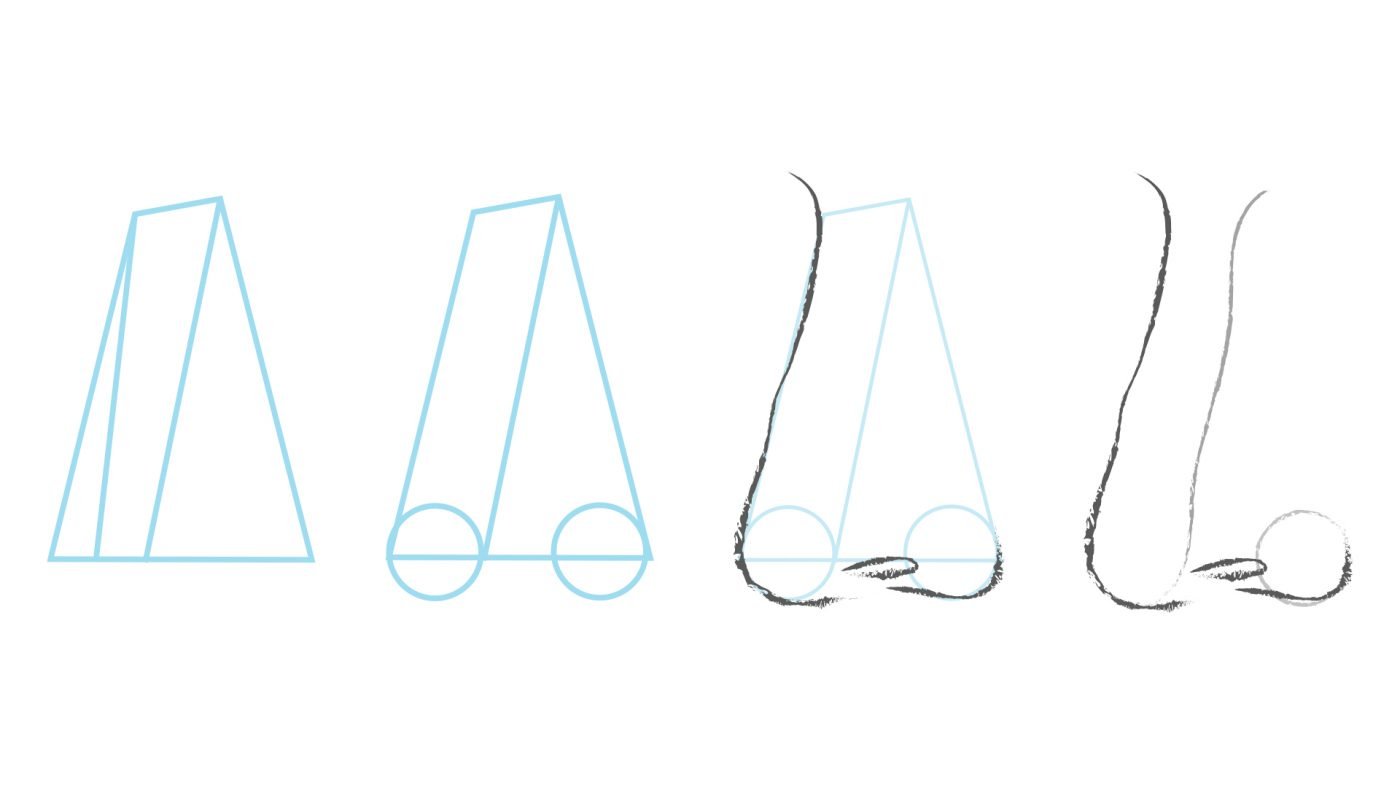
Simplify, simplify. When you draw a nose you need to break them down their basic shapes. From the front of the nose is a square with three circles and two side planes.
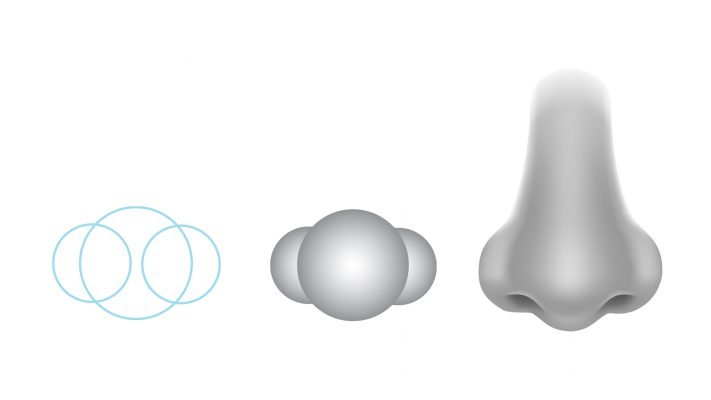
The tip of the nose can be simplified into three circles. Draw a nose using these simple forms.
When shading the nose to add form think of these as 3 spheres. Then Combine the three spheres into the nose, so the wings and septums are visible.
Pay careful attention to the three circles, how you place these circles will determine the tilt and the width of the nose

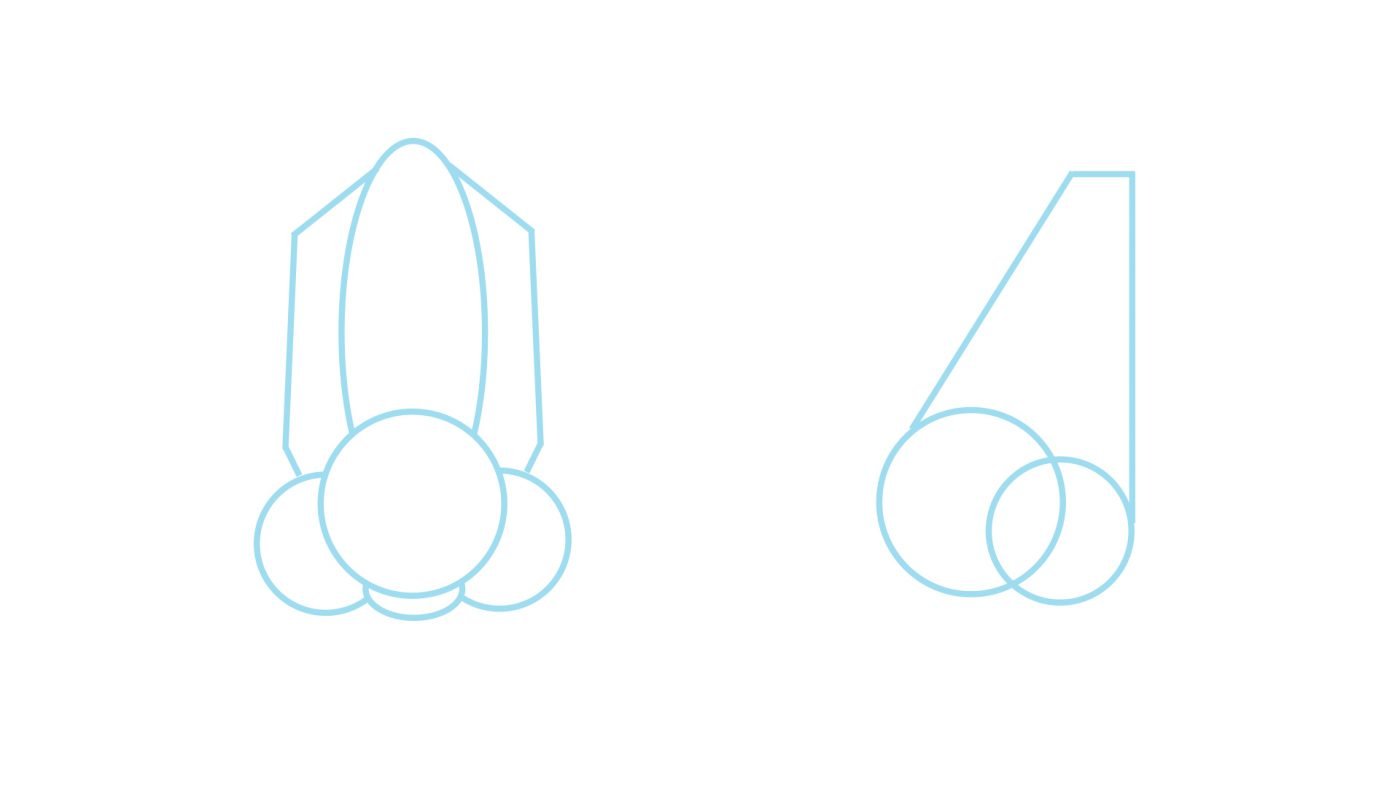
The Nose in Basic Planes
To make the nose easier to understand and draw, we can conceive it at the most basic level as a block with four major planes – front, sides and bottom – forming a long wedge on the front of the face.

When you begin to draw a nose -simplifying the structure makes it easier to grasp its relationship with the rest of the head, and how light and perspective affect the form. Solve these big questions first, and you’ll find it much easier to get the details right.
The wedge is narrower at the top and broader at the bottom. It is joined to the forehead by another small wedge-shaped form, like a keystone, representing the glabella on the skull.
The upper part of the nose has simpler planes than the lower and feels harder to the touch because it is supported by the nasal bone. The nasal bone influences the general shape of the nose – when it’s prominent, for example it creates a curved or Roman nose. A fracture of these bones gives the broken, wonky nose familiar in boxers or rugby players.
The lower half of the nose is made of a stiff tissue called cartilage – the only bone support is the slight spur of the nasal spine at the bottom of the nasal cavity. The cartilage is flexible enough to respond to the facial muscles, making the lower nose a bit more mobile and expressive.
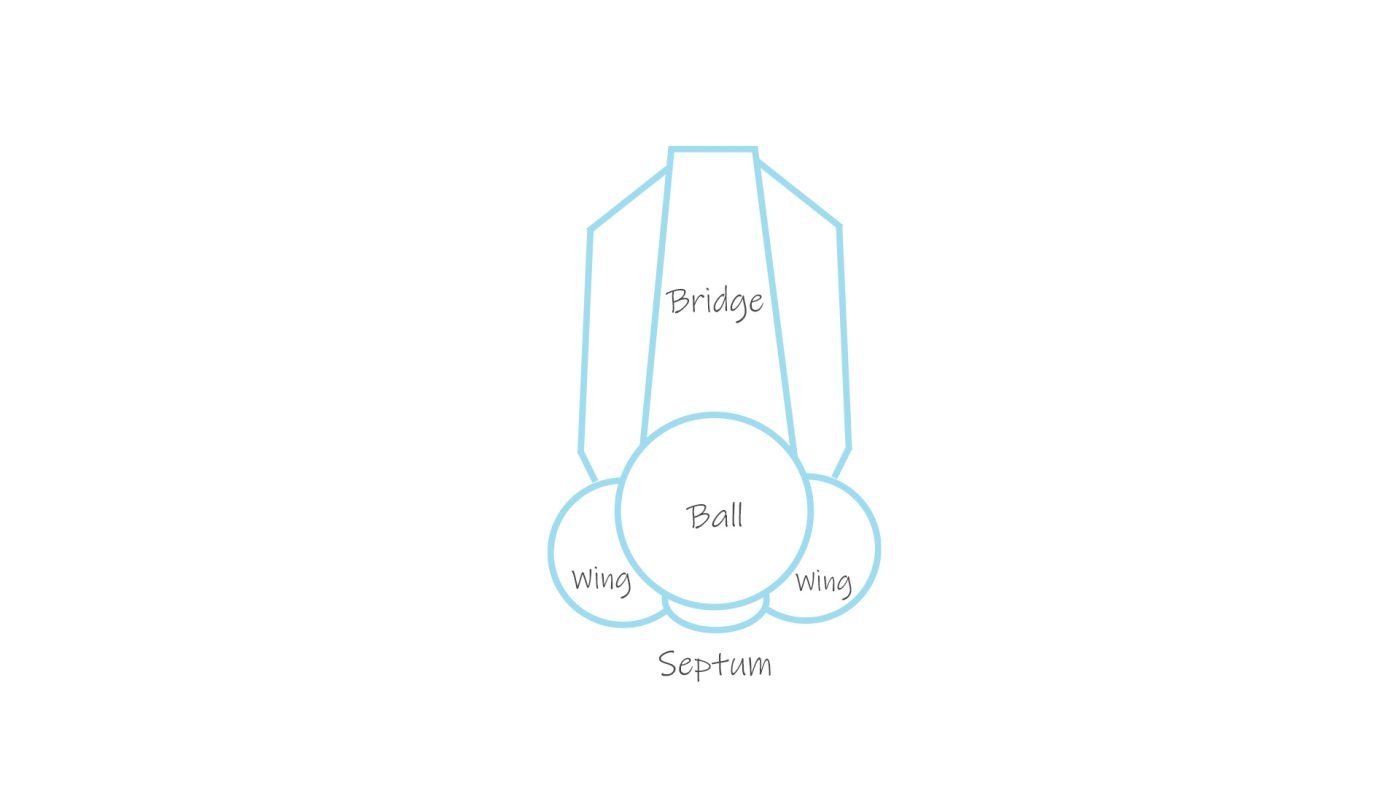
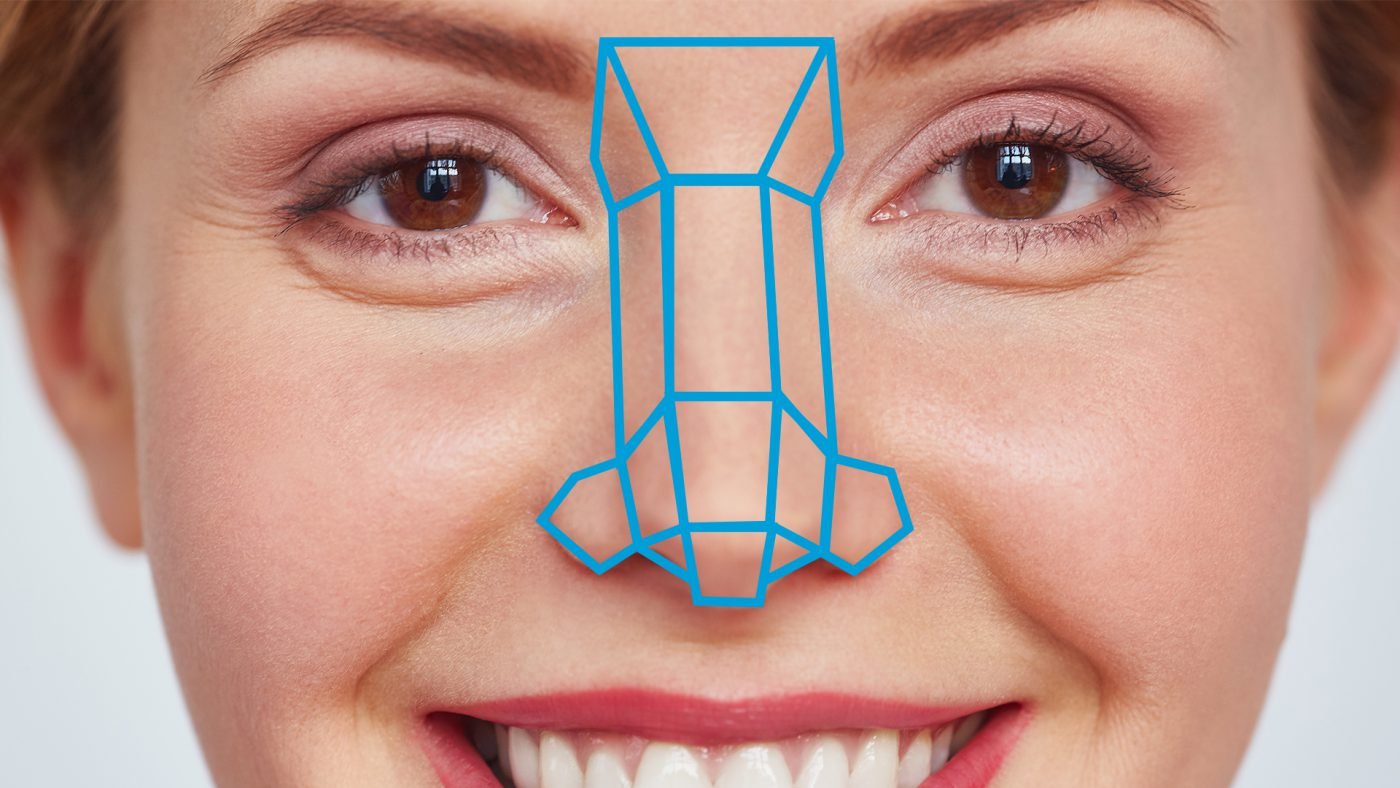
Bridge
You will sometimes hear the entire front plane of the nose referred to as the ‘bridge’, but really it’s the upper, bony part of the nose. It is defined by the nasal bone and the top corner of the maxilla, which sweeps down into the cheeks by the rim of the orbit.
You can sometimes spot the end of the bridge by a slight bump or change of direction on the nose (right), which marks the transition from bone to cartilage.
The lower nose
The trick in how to draw a nose is to understand all parts of their structure. The lower half of the nose is more complex. Structurally, it is made of several other forms built onto the basic block: the ball of the nose, the septum and the wings. To draw this, we need to develop the ‘wedge’ conception a bit further.
The block is not a straight column but more of an oval, with a bulge in the middle – this is more obvious in males.
The ball is like a bowl added to the front of the block – it’s the part most extended from the face, and often catch a highlight.
The septum is a ridge of cartilage that forms a dividing wall between the nostrils and connects the nose to the upper lip. (It is a popular place for nose piercings.
The nostrils are openings that allow us to breathe and smell, which extend partly into the underside of the septum. When drawing a nose think of the wings as two spheres on either side of the ball of the nose, and shade the area accordingly, with the septum added underneath:
You can adjust the width and spacing of these parts to draw different shapes of the nose:
Always remember that tools like these are only rules of thumb, and you can be flexible about them. Other artists use various techniques to help them grasp the form. Use whatever method works for you.
Try to observe the smaller planes, whose tonal shifts will help clarify the shape of the nose:
Just a word on schemas like I’m introducing here. It is rational and useful for artists to have a mental model of how things are structured. However, this has dangers. Firstly you may end up reproducing the same nose blindly, always including, for example, a bump on the nose even though one isn’t visible on everybody. Secondly, if you become comfortable with a particular cliché, you can lose sight of what real noses look like. There is no substitute for observing real noses in all their diversity.
Cartilage
The lower nose is made of several pieces of cartilage and fat, but the artist need only think in terms of five. Two forms the tip, two forms the nostrils and a fifth separates the nostrils. Knowing a little about them helps you understand where all these forms and planes come from when you begin to draw.
Between the nose and the lips is a distinctive vertical groove called the philtrum. We’ll look at this more when we study the mouth.
To draw a nose well, we need to observe the plane changes across its whole form. There is often a slightly darker tone at the ‘keystone’ where the glabella turns down at a slightly different angle to the forehead; then the tone lightens as the bridge of the nose turns up again.
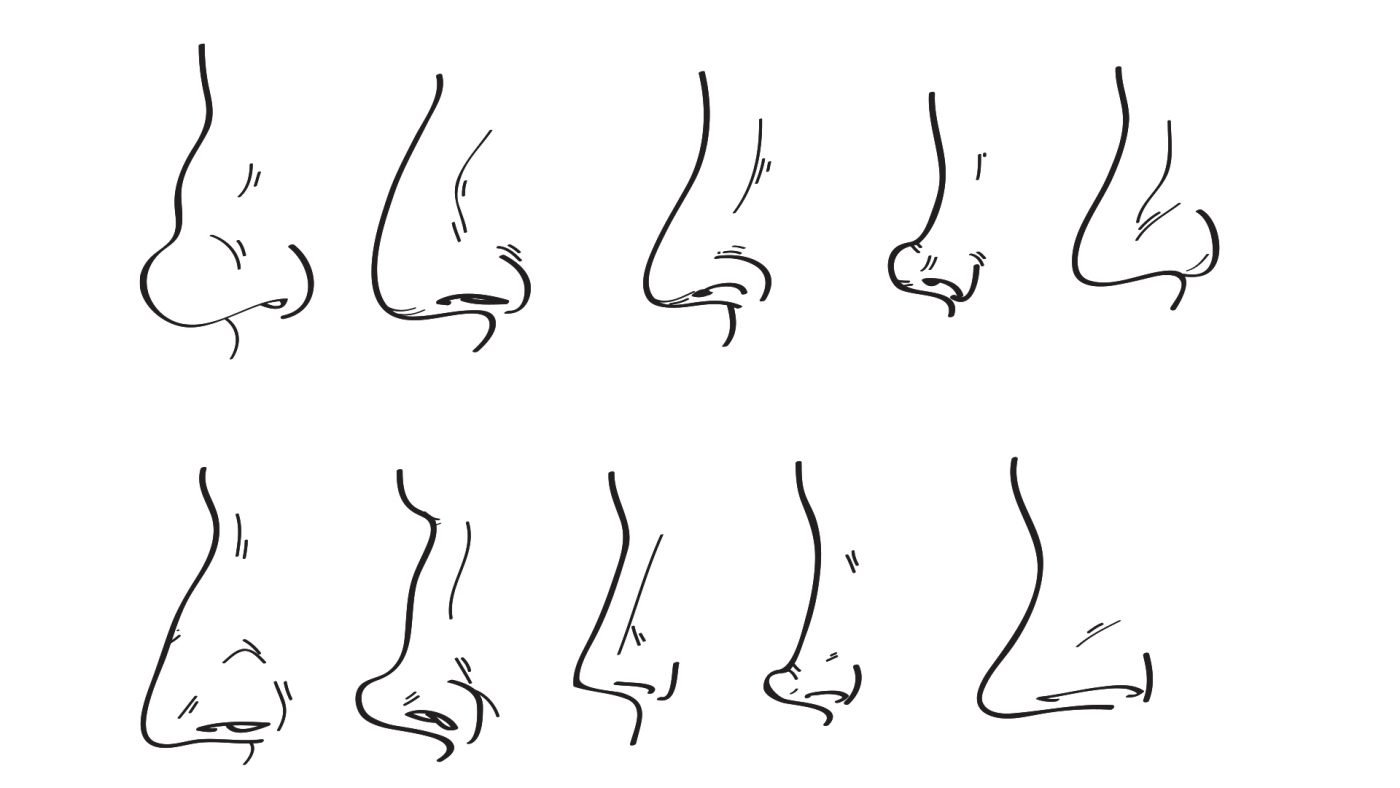
We refer to the ‘ball’ of the nose for simplicity, but this form isn’t a sphere. It has top, front and bottom planes, as well as a short side plane that is distinct from the wings. The real variety in human noses are found in the cartilaginous parts, not the bones. The nose can be more or less long or short, narrow or wide, pointed or bulbous, drooping or snub, etc.
Tips of noses
These types don’t only affect the profile – from the front, you will see more of the nostrils on an up-turned nose than you will on a nose where the tip droops.
The wings too, vary enormously. Remember to allow some thickness to the wing, and note that the nostrils face downwards, not sideways. The front of the face curves outward, so they attach further back than the septum. The nostrils curve in towards the septum without quite reaching it, creating a hole resembling not a proper oval, more a comma on its side. This hole has a sharper edge at the top, and a softer edge at the bottom where the recess fades out. Because the nostrils are on the bottom plane and are recesses in that plane, they will be the darkest place on the nose.
Step by step: how to draw the nose
Exercise 1
Draw a nose from the front. Identify the planes and basic shapes, then add shading and texture.
Here is a step-by-step tutorial on how to draw a realistic nose. We’re going to do noses from three angles: front, side and three-quarter.
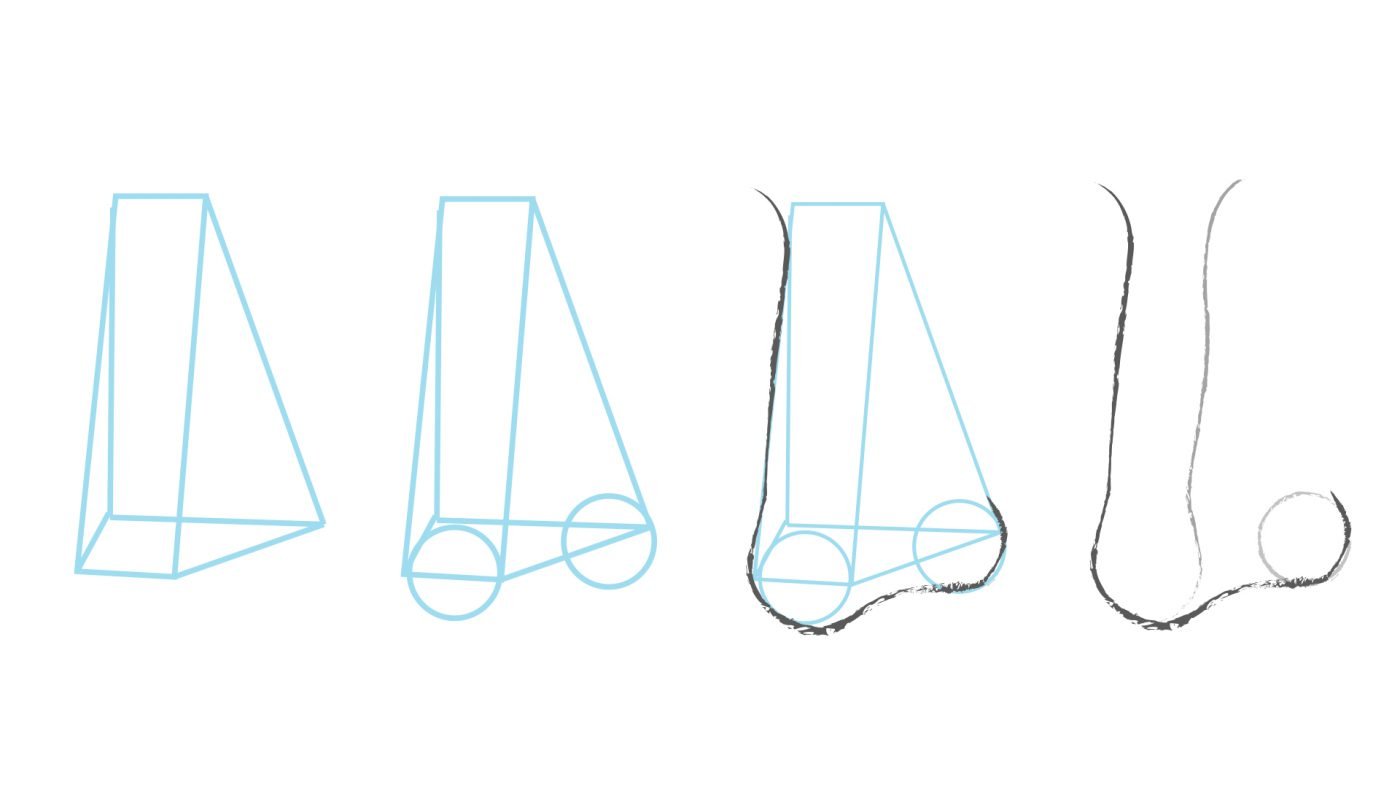
1. Start with the basic shapes
Simplify the nose down to the basic shapes. Identify the circles and triangles.

2. Add the Simple Planes
Now identify the simple 4 planes.
3. Start Shading
Determine where the light source comes from and how the light affects each plane. Decide upon your light source and mark out the major lights and darks.
Here is a tip for when shading the nose;
A nose consists of three circles. When shading the nose to add form, think of them as three spheres. Then combine the three spheres to the nose, so that everything is visible.
4. Add Details
Now build up the details and forms. Stay aware of the minor planes as you add subtle shifts in tone and reflected light.
Refine the forms by adding subtle, mid-range tones. On the nostrils, the top edge of the opening tends to be relatively sharper than the bottom edge, but this is a soft, shadowy area so maybe avoid defining it too precisely.
Work away at the highlight on the ball of the nose so it doesn’t look too crude and shiny. Create a nice soft transition between the slightly darker tone of the downturned glabella and the bridge of the nose. Use a bit of darker tone to emphasise the change of plane between the side plane of the nose and the wing. Add some proper highlights. These depend of course, upon your light source. You will usually see a highlight on the nose tip, down the bridge of the nose, and on the wings.
4. Finishing touches
Work over your drawing, checking you are happy with the relationship of lights and darks. For example, you may feel the darks need to be a bit darker, the lights a bit lighter. To draw a nose accurately you need to pay attention to detail so check the relationship between hard and soft. Sharpening a few edges like the nostrils will help your nose stand out; in areas of soft, curving flesh the transitions too should be soft.
It’s good to finish off by putting some thought into the texture.
Exercise 2
Simple Planes
Draw the planes and the basic shapes
Also determine where the light is coming from, on which the light fall and on which will fall the shadow.
Complex Planes
When you draw a nose try breaking the nose down to more complex planes
Pay attention now to all the little details, shades and different variants of light and dark.
Also keep in mind the structure of the nose.
Imagine you are constructing a nose out of cardboard box and what would that look like. If it too complicated – go back to the previous exercise.
But challenge yourself to see and understand the structure of the nose.


Exercise 3
When you draw a nose, it’s great to have schemas and methods as we’ve discussed here, but nothing beats finding pictures of noses, or looking at your own in the mirror, and drawing what you see.
If there are things you struggle with – the precise relationship between nostrils and septum is a likely candidate – then make a point of studying and drawing them until they are no longer problems.
It is important to have ideas of how to approach certain things. But nothing beats drawing from life. Even look in the mirror and draw your own nose from various angles.
Practice makes perfect. Repeat, repeat, repeat.
Do not beat yourself up about what you cannot get right and continue to go back to first steps or simpler methods when you draw a nose.
Shop Drawing Supplies online with us
Our online store aims to remove all confusion when it comes to shopping for art supplies. We only stock what is really needed and don’t flood you with choices. To view drawing supplies:
-
 A3 Toned Paper Clay Pad 120gsm FabrianoR380.00
 -
Faber-Castell Graphite Sketch SetR115.00
-
A3 Toned Paper Sand Pad 120gsm FabrianoR300.00
-
Cretacolor Kneadable EraserR25.00
-
Mechanical Pencil HB 0.5MM – DerwentR136.00
-
Drawing MangaR215.00
-
Fundamentals Of Drawing 3 – Leonardo CollectionR245.00
-
Black Charcoal Pencil 3pcs – Koh-i-NoorR89.00