Kids Art Projects
Challenge yourself to make a Lino print, and the 6 items you will need.
Jun
Hi, I’m South African fine artist, Lillian Gray. Today I’m going to show you the basics of printmaking. We will be doing linocut.
Supplies that you will need
- Lino sheet
- Lino tools
- Spoons
- Breyer/Roller
- White pencil
- Lino ink
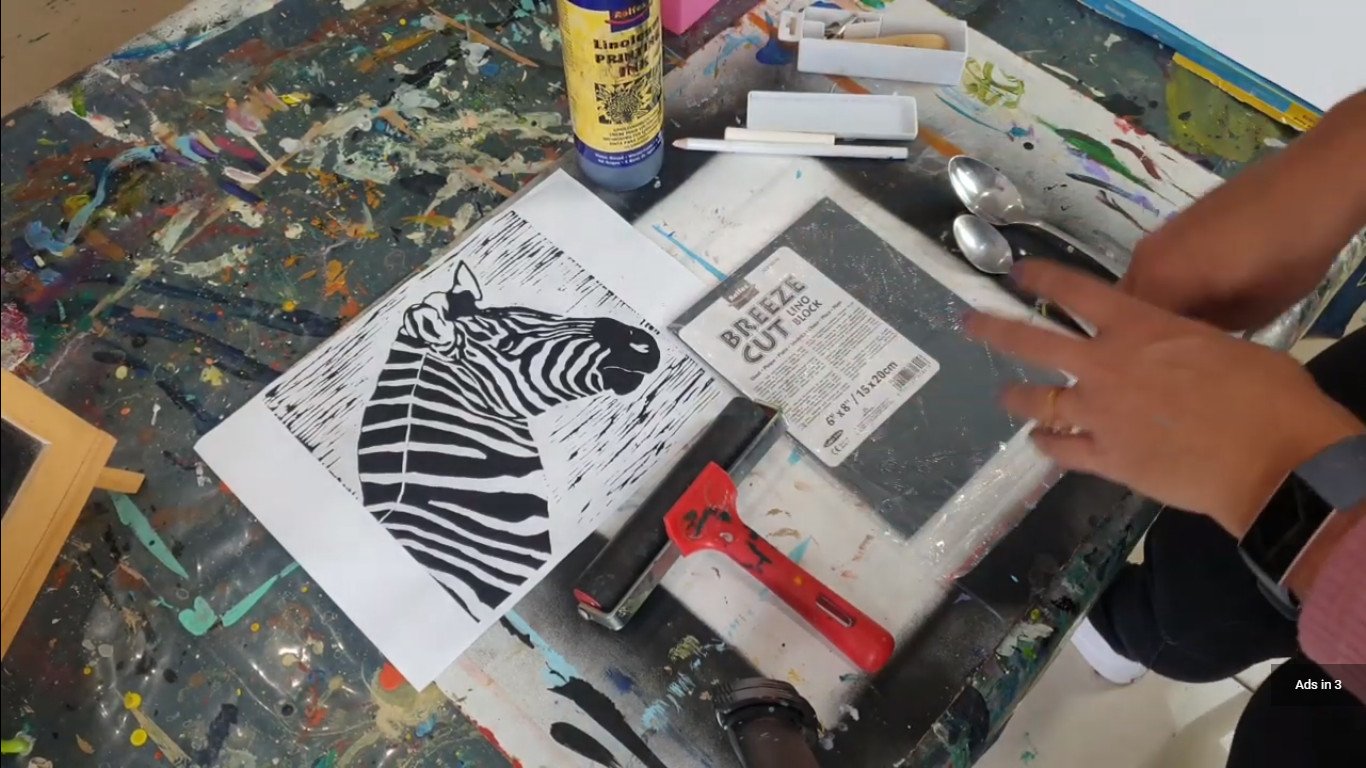
You’re going to need is a sheet of lino. This is called lino block or linocut. There are various brands on the market. I love Rolfe’s, they’re pretty affordable and they are great to cut. A cheaper option is where people actually use linoleum flooring tiles to cut with, but I don’t think this costs that much.
I think it’s a wonderful to have. You can have your breeze cut. They come in different sizes, depending on how big you want to print. I’ve got a brayer, which is my roller to apply my ink. I’ve got my lino cutting tools, once again I prefer to use the Rolfe’s one, which has got various nibs to cut with and, I will show you guys how to use these.
I have white chalk or a white pencil, a reference of what I’d like to cut out and draw. I’ve got two nice big spoons to print with. This is also a money saver because you don’t need a printing press. I’m going to show you how to print with a teaspoon, which is much cheaper. I’ve got linoleum ink. Now lino ink is very different from acrylic, this is much stickier, it takes longer to dry.
Acrylic really doesn’t work. Your paper ends up tearing and it dries too quickly, so it doesn’t really work. This one is much better, it takes much longer to dry, gives you more time to print accurately, and the stickiness factor helps that your print doesn’t move around. So those are the basics of what you will be needing, and you obviously need paper to print on.
Getting your image onto the lino
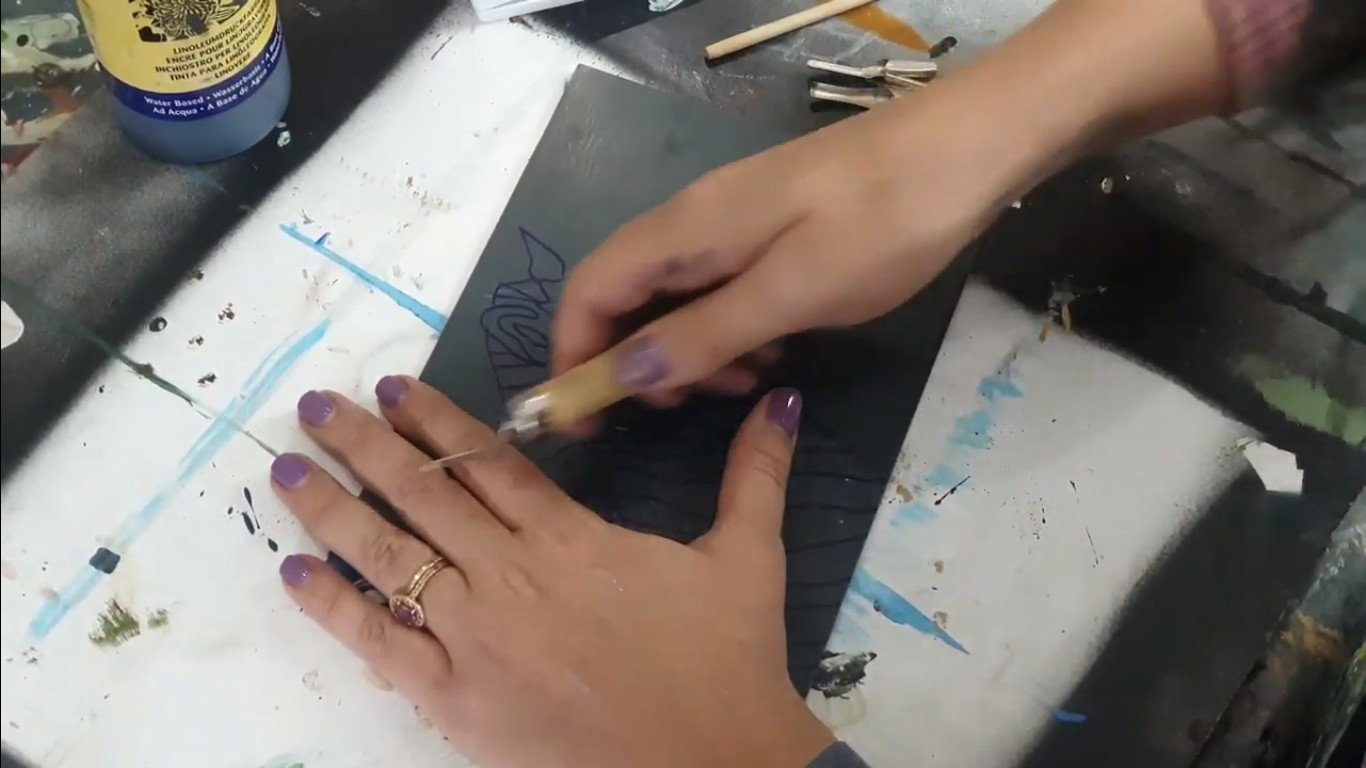
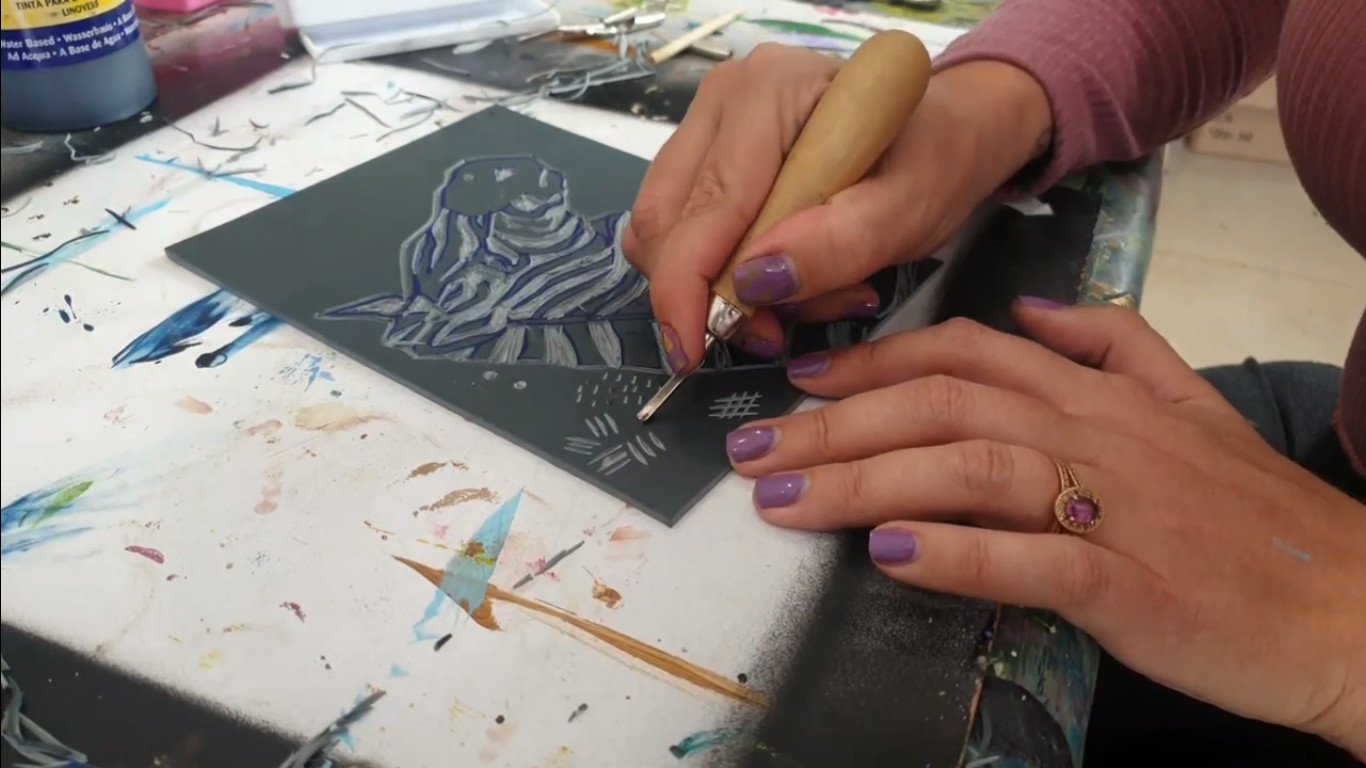
Putting your image onto your linoleum, there are various options. I like sketching out and finding my shapes first. I do that with chalk. The reason for chalk is, I can just loosely create my lines and see where I want what, and properly plan. I don’t want to have too much open space and make sure that my zebra fills my area. If you don’t like what you’ve done, you can simply just wipe it off and start again. Once you have committed to your shapes you can draw them out properly.
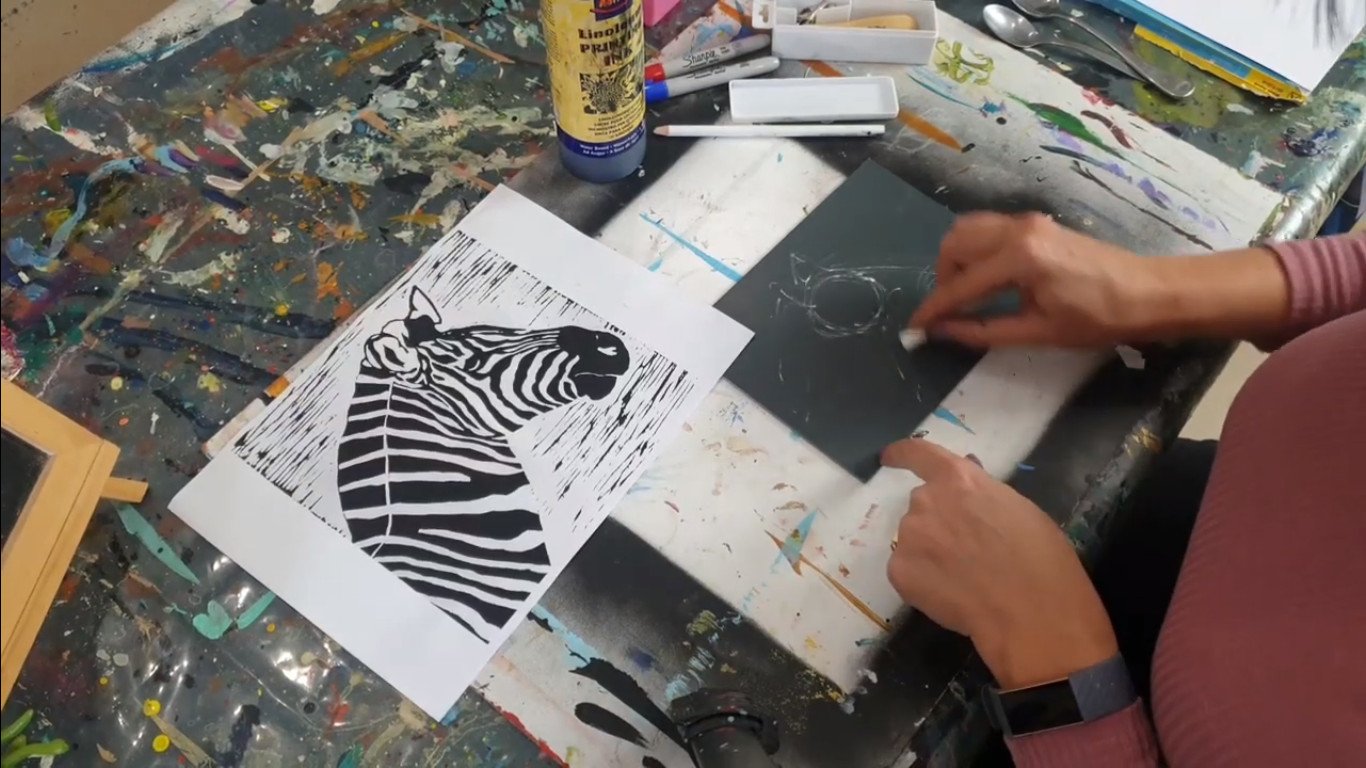
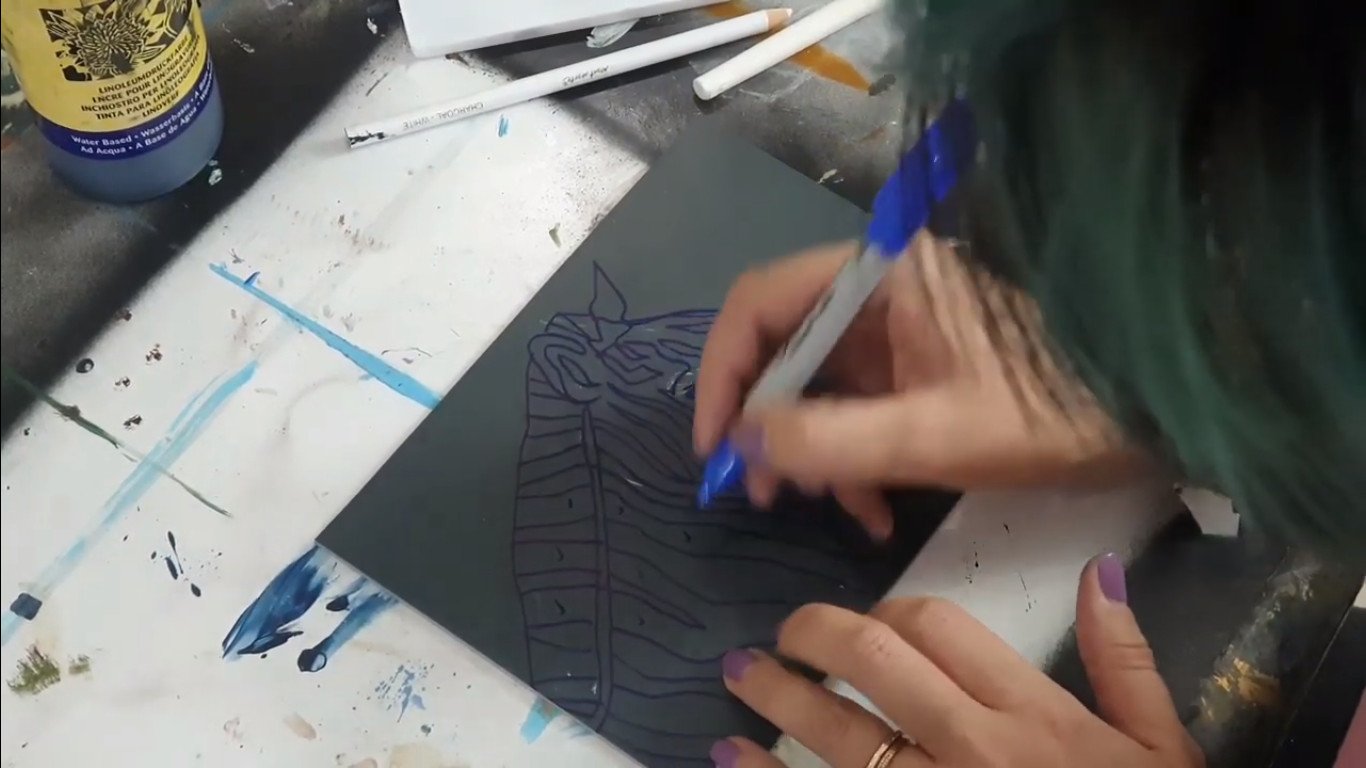
A nice white pencil also works really well to be able to see what you’re doing. If you don’t have a white pencil you can use a khoki (sharpie). The khoki will show on the lino, it’s not always as clear, but you can use a khoki to draw out your drawing. With Lino it’s very important to realize that it’s kind of the opposite. You’re cutting away everything that needs to remain white, whatever you want to print remains black, you do NOT cut. So it’s the opposite of a pencil drawing.
Black stays, white out. What that means with my zebra is that I am going to keep my black stripes. If you want to just have a little cheat, you can make little tick marks and what you want to keep, and X’s on what you want to cut out just so you don’t get completely confused. I always say be kind to your inner artist, if you’ve got a little trick that works for you and makes it easy, go for it. I kind of know what I’m doing, so this is how I’m going to approach it.
I’m going to quickly explain to you the tools and the different nibs in your pack. You will usually have at least five different nibs, small, medium, and large. It really depends on what you’re going to be making. For finer detail, you’re going to be using your smaller nib. For bigger lines and thicker line quality, you’ll be using the bigger nibs, to really take away in a complete area, you’ll use the soft blade.
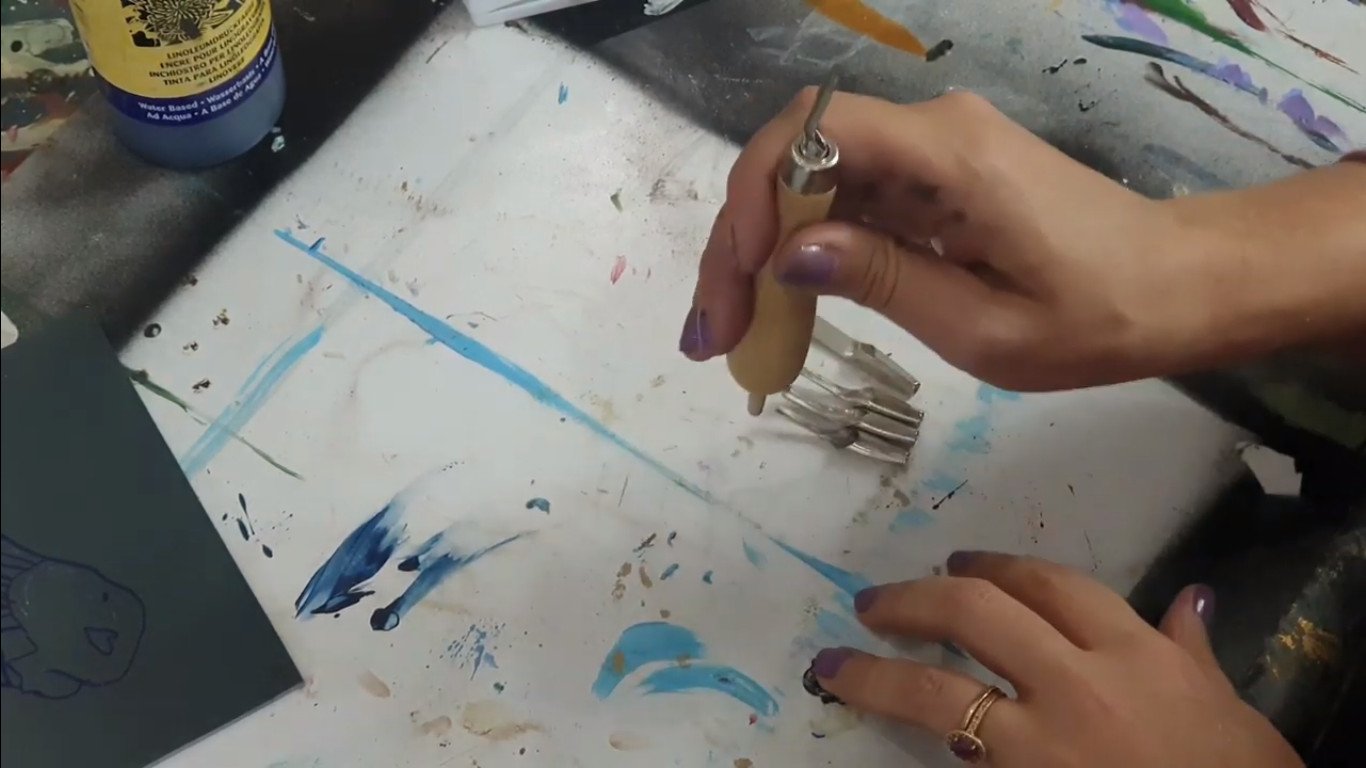
To reload your tool, you simply just push in your little stick, I’m going to knock the table now. You knock and it comes out, and then you can switch to the next one. Safety rules, the most important thing and I cannot state this enough, you never, ever, ever point this tool to someone. You never try and use it for stuff it’s not meant for, you don’t use it when it’s blunt. To sharpen it you literally just take some sandpaper, a hundred grit, and you can sharpen it quite nicely.
The most important rule
The most important rule, never, ever, ever cut towards your body. If this thing slips, you will impale yourself, it’s going to be really eina. You always, always work away from your body. Also, bear in mind that if you place your hand here and cut like this, you are working towards your body. So every single body part of yours, everything that sticks out, keep it away from the tools, move away because it can slip, and once that slips, you have got no control. Trust me, they cut quite deep.
How do I do the cutting?
What I often see students do wrong is, they delve in like this. You are not digging for oil. That is just gonna get you stuck. We never want to be a Land Rover stuck in a marsh. We want to be ballerinas or ice skaters in art. We want to glide. I am gliding. I am not actually pushing that hard. This lino is not about strength. It’s just about keeping your blade sharp and gliding with a steady hand. Now I’m cutting away my stripes. What’s also really important, is that you guys don’t poke a hole straight through.
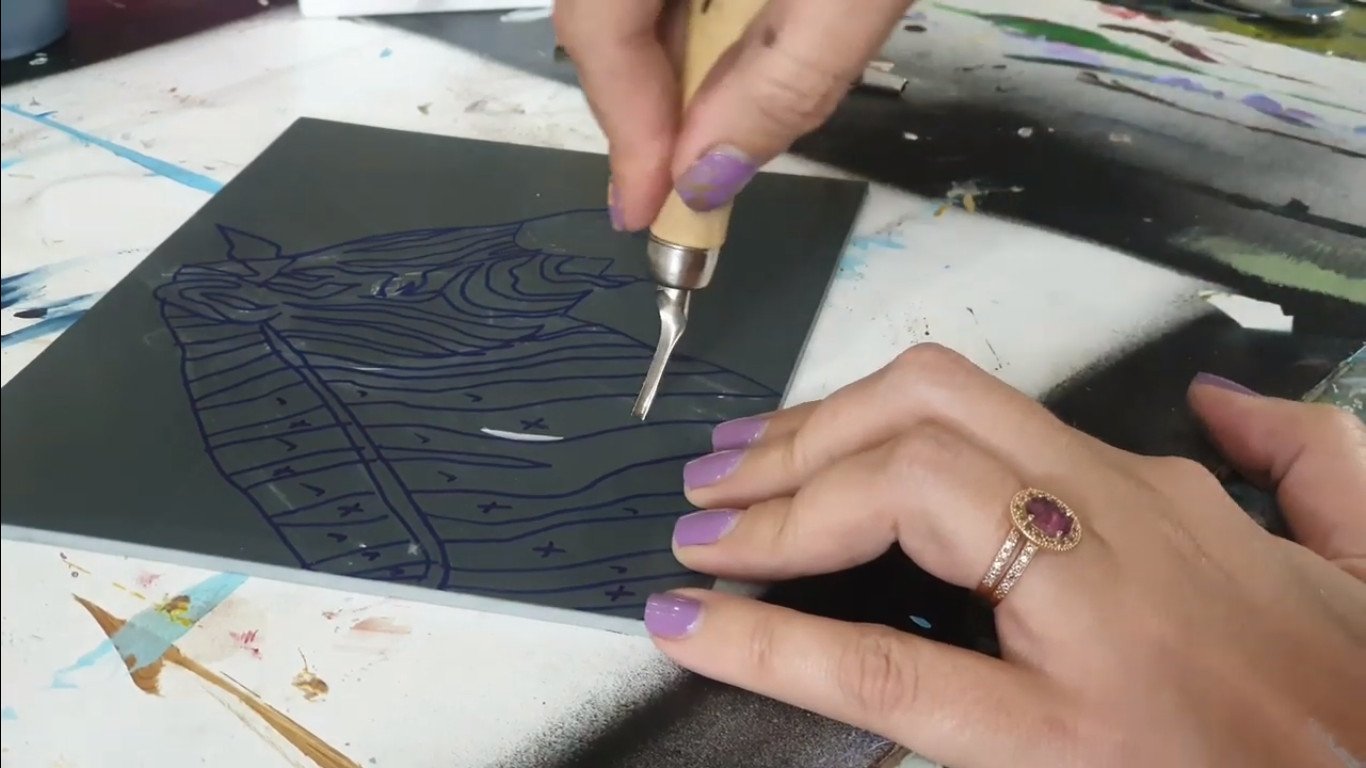

Lino is different from painting. With painting you can paint over your errors, with lino, once you’ve made the mark you’ve committed, you’ve made the mark. The only way to fix it is to start over with a new piece of lino, and lino can get expensive if you start working like that. Rather be more accurate. Rather just go lightly and then once you know exactly where your lines are, switch to the thicker broader blades. For now, I’m just going to use the small blades and make sure everything is exactly where I want it and I don’t get stuck. Remember, gliding!
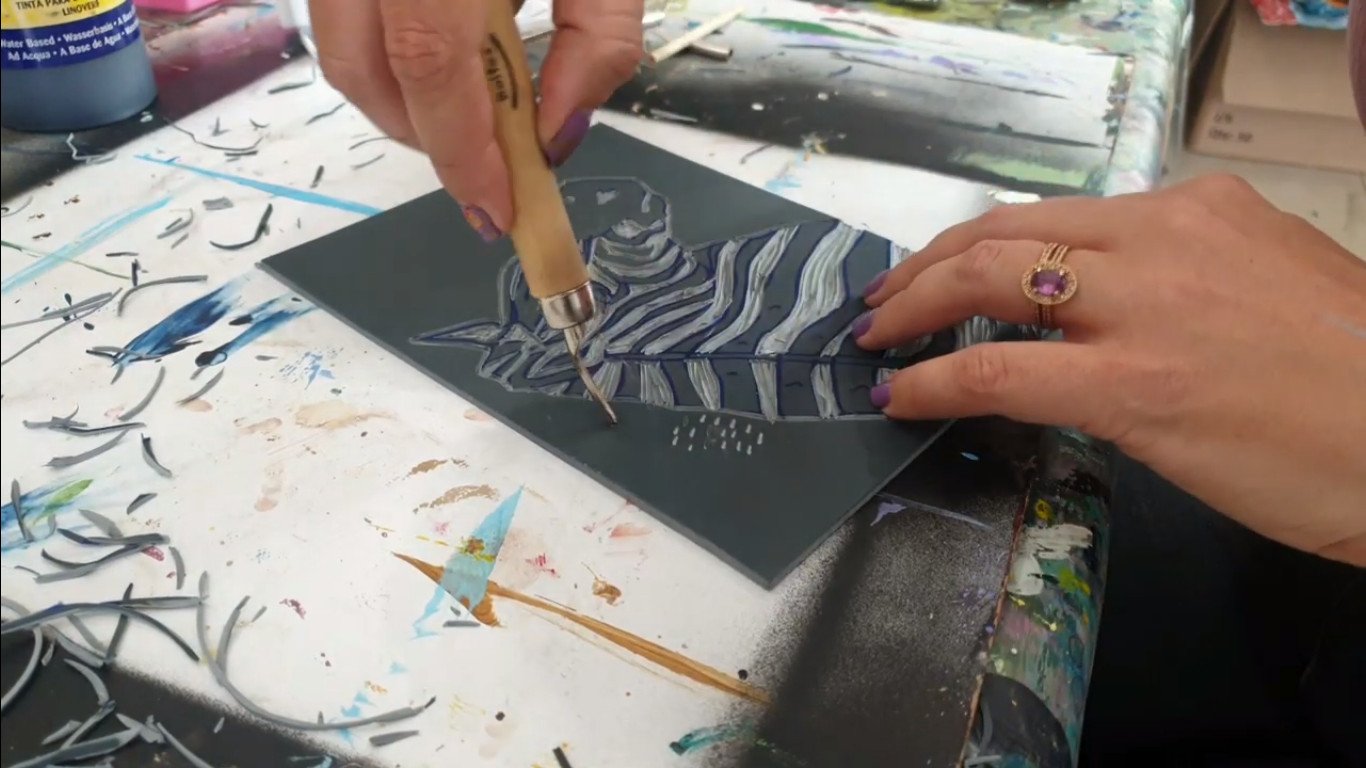
One of the elements of art is line. Let me show you guys. Line quality is really important. When I speak about line quality, I’m talking about is your line thick, thin, hard, fast, slow, and textures, how do we add different textures with different lines?
I just want to show you here in this corner, just a few techniques. Like you do in pencil sketches, you can stipple. You can also stipple in lino by just removing small little areas. When you need to make a dot you can also, what I like to do, is I like to keep my tool and just swivel it in one place.

Then I’ll get a nice dot for the highlights in the eye. That works well. You can also do some cross-hatching in lino. If you want to really add some interesting marks, there’s a little crosshatch. You can also do a little basketweave. Basketweave is one, two, three, twist in a different direction, one, two, three, one, two, three, one, two, three, one, two, three.
And you really get interesting marks. You want your print to be visually interesting and, not be boring. So add interesting texture, patterns. If you’re doing an African theme, remember Africa is loud, proud, and bold, and they have very diverse patterns. It really helps to know these different mark-making techniques.
How do I apply the ink?

I’m going to be squeezing out my lino ink. You can use any flat tray. This one is specially made for printing. I’m going to squeeze it out long so that it covers my entire breyer. We’re not going to just make a blob here in the middle. I’m going to start moving back and forth with my brayer. You’re going to see that this is quite sticky. This is too sticky, so what I’m going to do is, I’m just going to add a tiny bit of water to my ink.
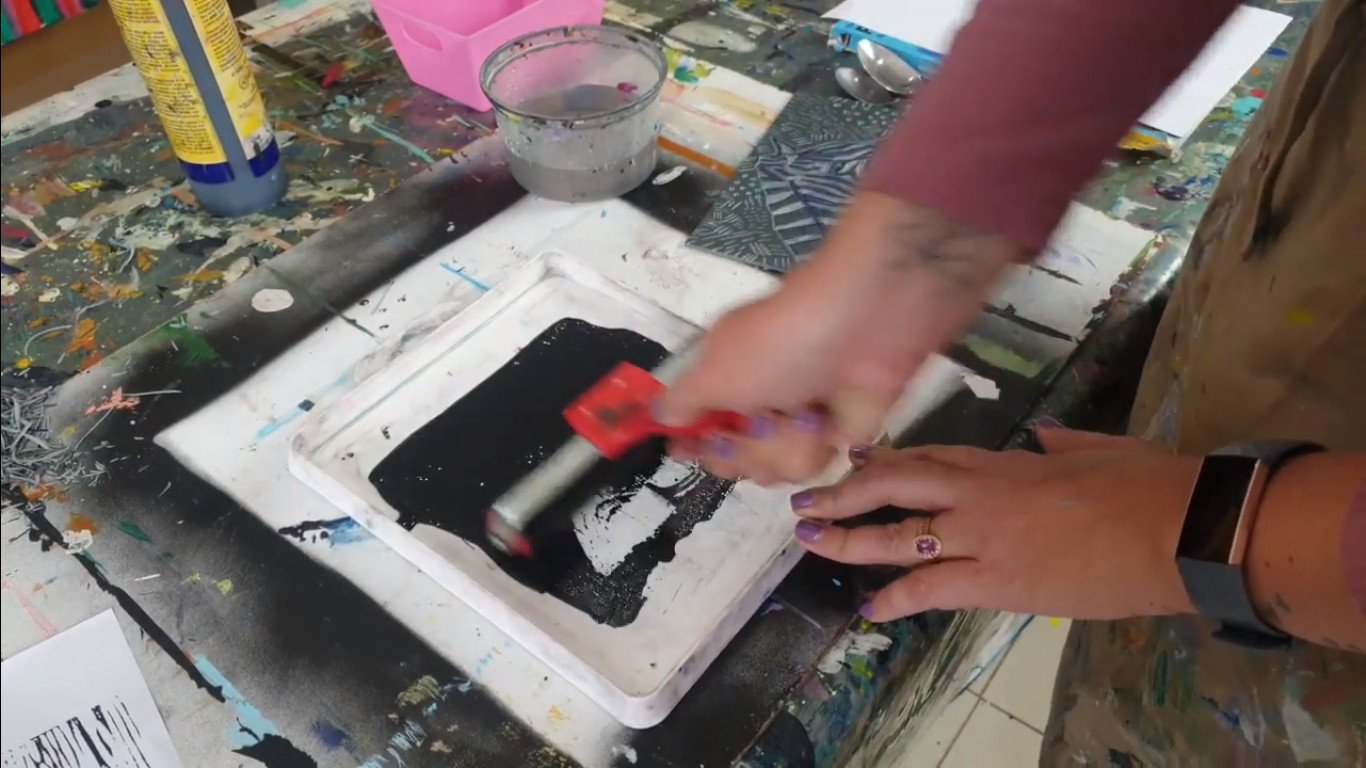
If you buy the ink brand new it will probably not be sticky, but like I said stickiness is actually one of the properties want. Now I can see it moves nicely. Now I am quite a happy chappy with my ink. I have prepared my ink. Let’s now place the ink onto the lino.
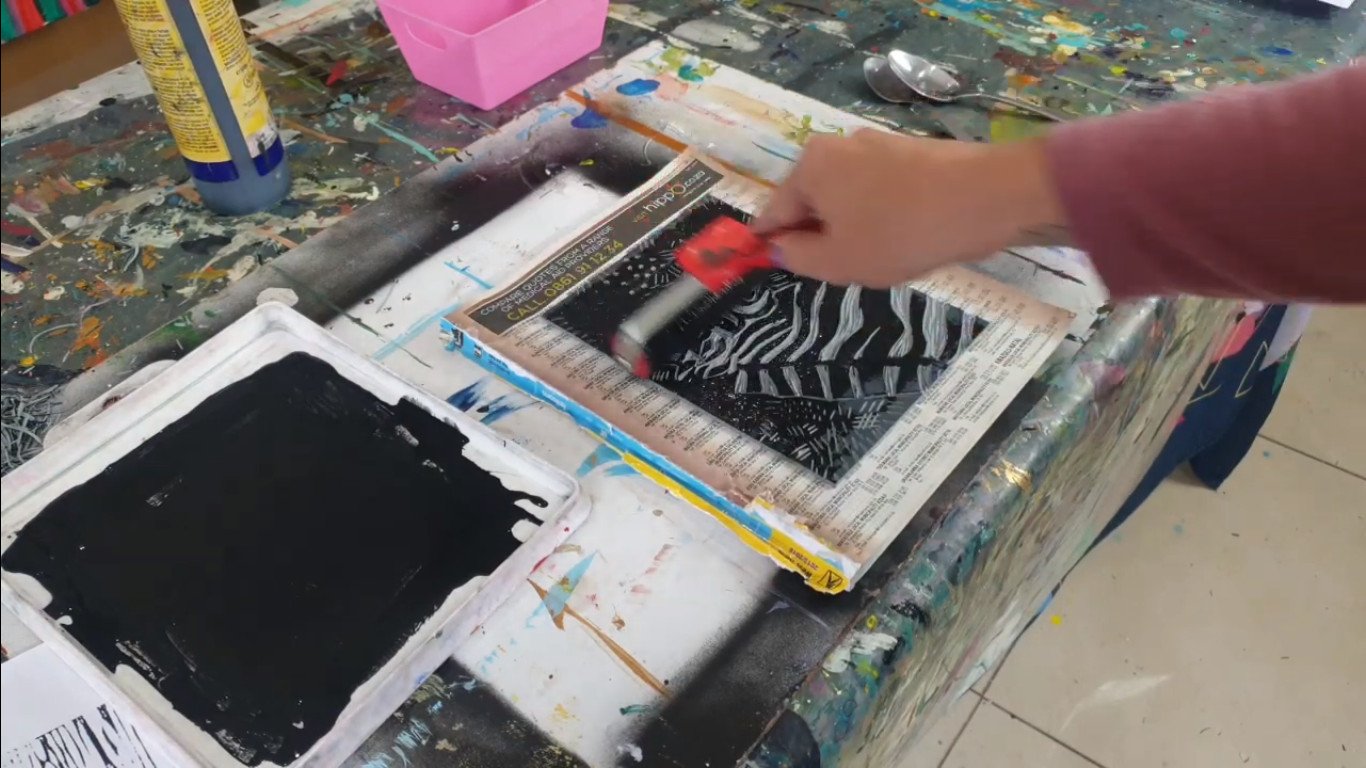
I’m working on an old telephone book, a lot of you won’t know what this is, it’s from an ancient time, but I like rolling out my ink on it, and when this page gets dirty, I like tearing out the page and going to the next page. This really keeps your station clean, because this ink is so sticky and it really gets onto everything. Let’s start rolling and we’ll see where we’re going with this. I’m going to be moving my ink over now.
Making a test print
If you’ve added too much water your ink is going to roll into the places that you’ve carved away. That is a disaster. You’re going to have to wash your lino and restart. As you can see here, my ink has gone into those marks, so my ink might have too much water in OR my lino simply isn’t cut deep enough.
I can see that I didn’t cut that deep enough, but let’s do these prints and see what happens, so we know what else to change. I’m using just a quad paper, 300 grams and it’s very smooth. I like printing on very smooth paper. I am going to carefully take my lino and flip it around. I’m going to leave enough space around my edges. Once you’ve committed and put it down, leave it don’t move it around. Now I’ve got a clean brayer and I’m going to apply pressure with this brayer. I’m applying pressure at the top with my brayer.
Now you all don’t have a printing press at home, but what works really well is an old spoon. What you want to do is you want to really apply pressure. I’m putting my finger on my spoon and I’m making sure I’m pushing pressure, absolutely everywhere on this lino, to make sure it’s nice and even.
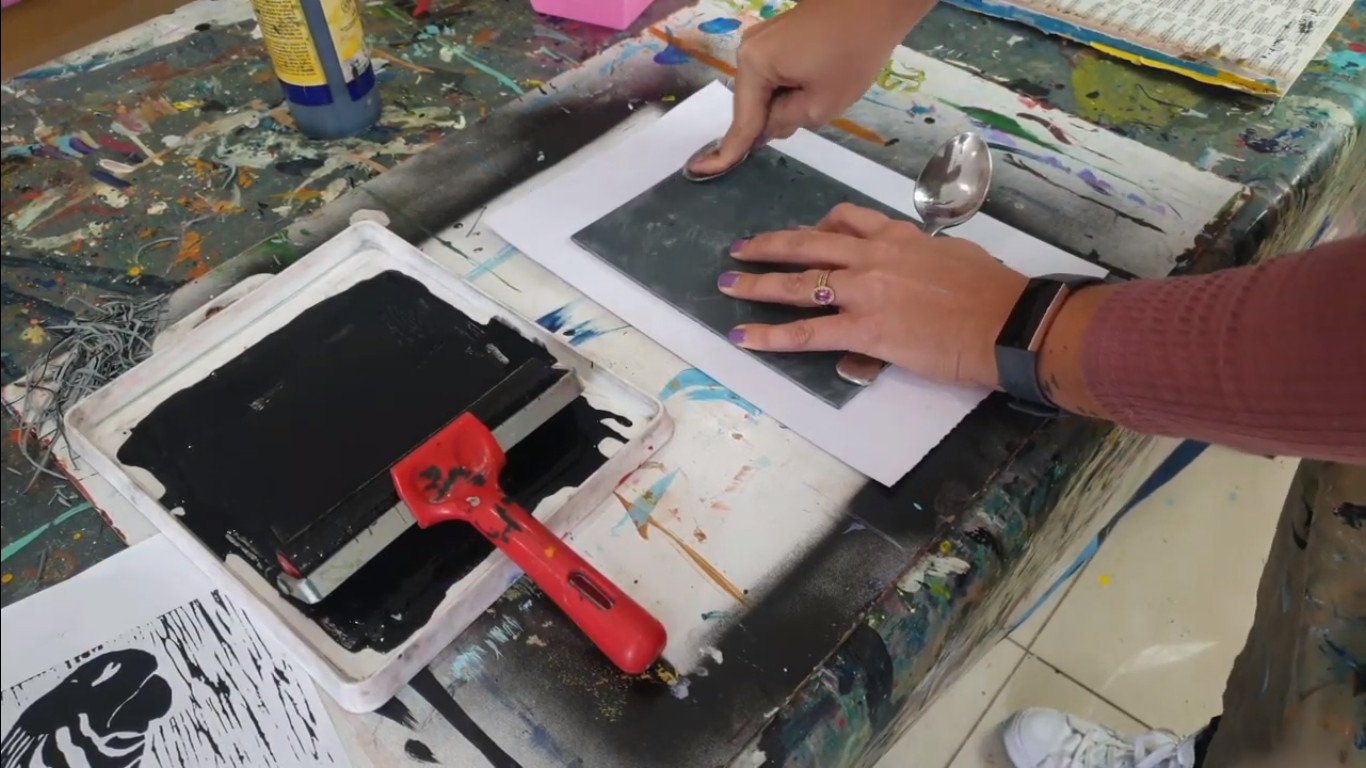
This avoids the cost of a printing press and the operation of a printing press, which can be quite hectic. I’m literally making sure I’m rubbing every single area and you can use a bigger spoon if you have a massive lino. I don’t use a teaspoon. For a lino this size, a teaspoon works quite well. Just make sure you plan a lot of pressure, absolutely everywhere.
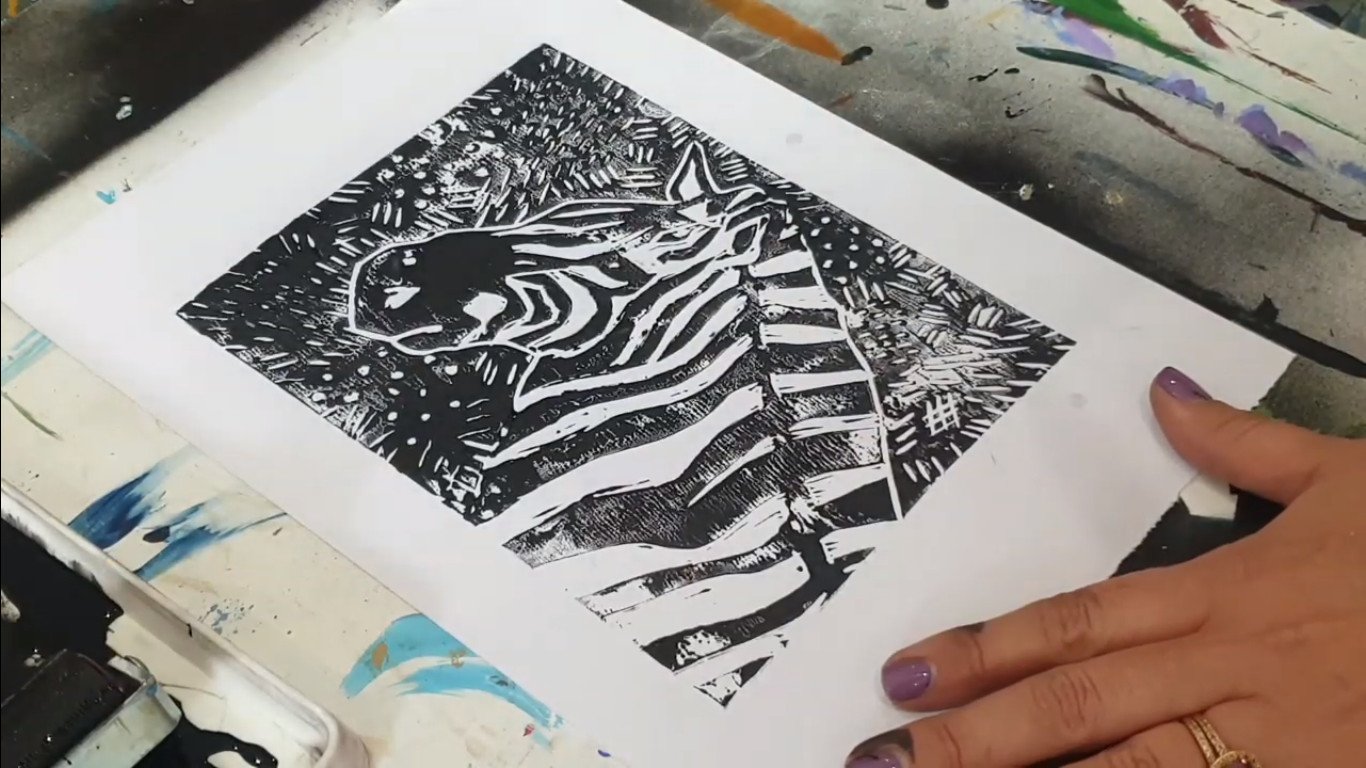
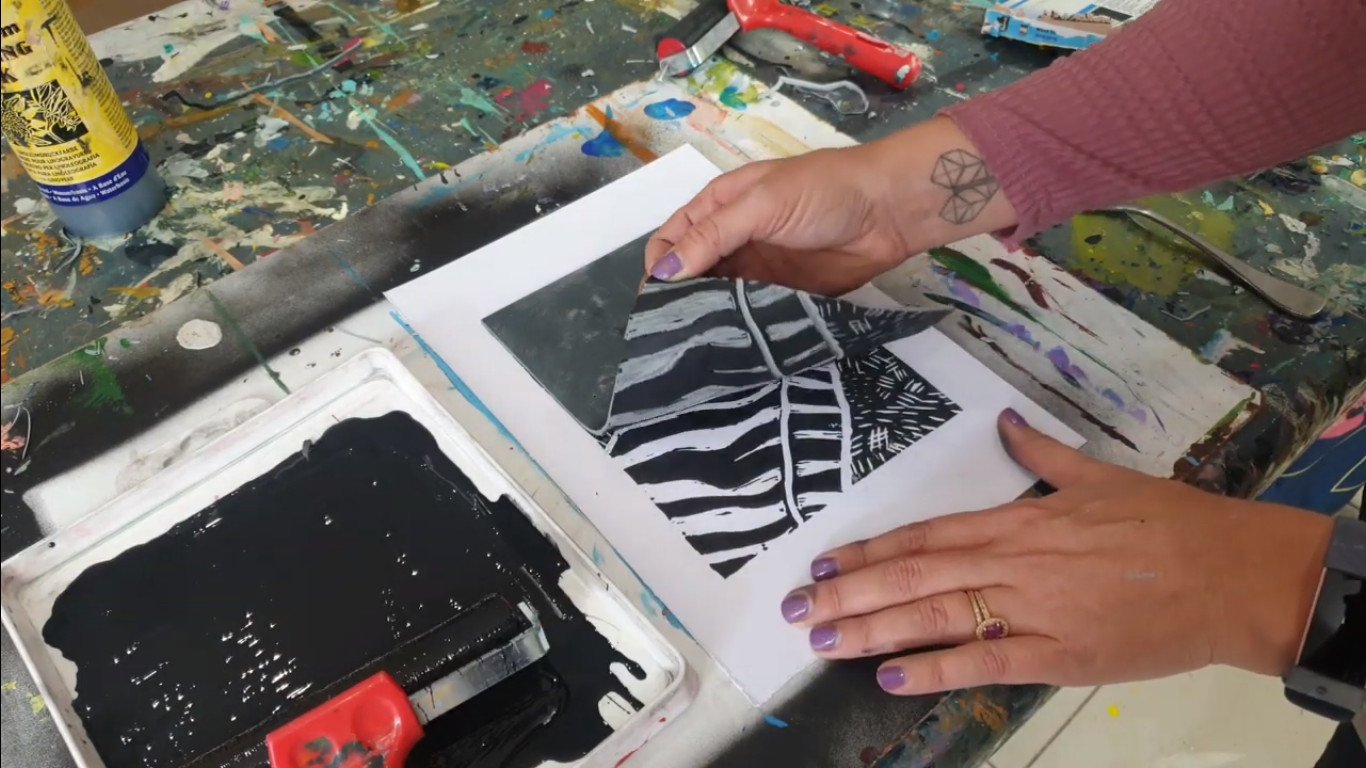
Now let’s see how this baby printed. if I applied enough pressure, if I did all my mark-making correctly, let’s see what this reveals. So there is my first print for my zebra. This is just a tester, so I can now see what I need to correct. I don’t think my ink is dry enough. I’d like to see more black. This is considered bad in inking printing when this happens. But it’s nice to see when my lines are at. I think I can make my outer edge a bit thicker, and just tweak a few of these other marks and we’re going to print it again.
Now I can really see where the issues are. I really thought that this area could have printed crisper, so I can really clean this up and make this line thicker and much deeper. I can also see where in my patterns they were too shallow, and I need to add more depth. So really clean up your print to make sure that your next test run prints more beautifully.
The final print
I’ve now really adjusted my print and I think it would make a much cleaner print. And I tweaked some stuff. Now, let’s check for the second time. For my previous print, my ink was too watery, so I’m just going to make this sticky again by adding more ink, making sure to cover my entire brayer, and then it rolls out evenly. I’m now on a new page of my telephone book and I am going to be rolling out my ink. Nice and sticky. Hear the stickiness. I can see that my zebra is still not going to print beautifully. Now we’re going to move on.
Ready for the reveal? Let’s hope this came out well. I’m slowly going to lift. Now I can see that is a proper black and white print. My blacks are looking nice and solid. You can see that I’ve pressed hard. Here I could have pressed harder with the teaspoon, could be a bit more critical of myself here. But overall I really like this print and I’m excited about this.
Why lino instead of painting?
Some of you might have questions like, okay Lillian why a linocut? Why printmaking? Why can’t I just paint this zebra in ink? It will look the same, yes it will look the same, you can have the same effect. But the beauty of lino is the fact that this is like a stencil.
You can print over and over and over again. Usually what artists do is, they have a limited print range, they’ll say, this is 1 of 20 or 2 of 20 and so they continue. They only print 20, sell 20 prints and that’s it. It’s a helpful way to make money out of a lot of craft and then selling that for repeated income. But there are other tricks that are wonderful with lino and just as a fun end off I’m going to show you how to make wrapping paper out of this.
Remember this is lino for dummies. I’m keeping it quite simple in this lesson and I’m not showing you how to work with multiple colours. We’ll do another video on that, but I’m just going to show you a fun way of adding extra colour is by actually printing on colourful paper, so we’ll do that. You can also print on old music sheets, it looks awesome, all journals, print on magazine papers.
Think of William Kentridge, he prints on anything he can find, printing in old dictionaries, it really looks awesome when you do lino on various kinds of papers, you get some interesting stories and interpretations of that. I’m going to switch to blue lino ink and I am just going to be printing that. And I’m just going make a fun gift wrapping paper that I could use for whatever I want. Let’s get rolling.
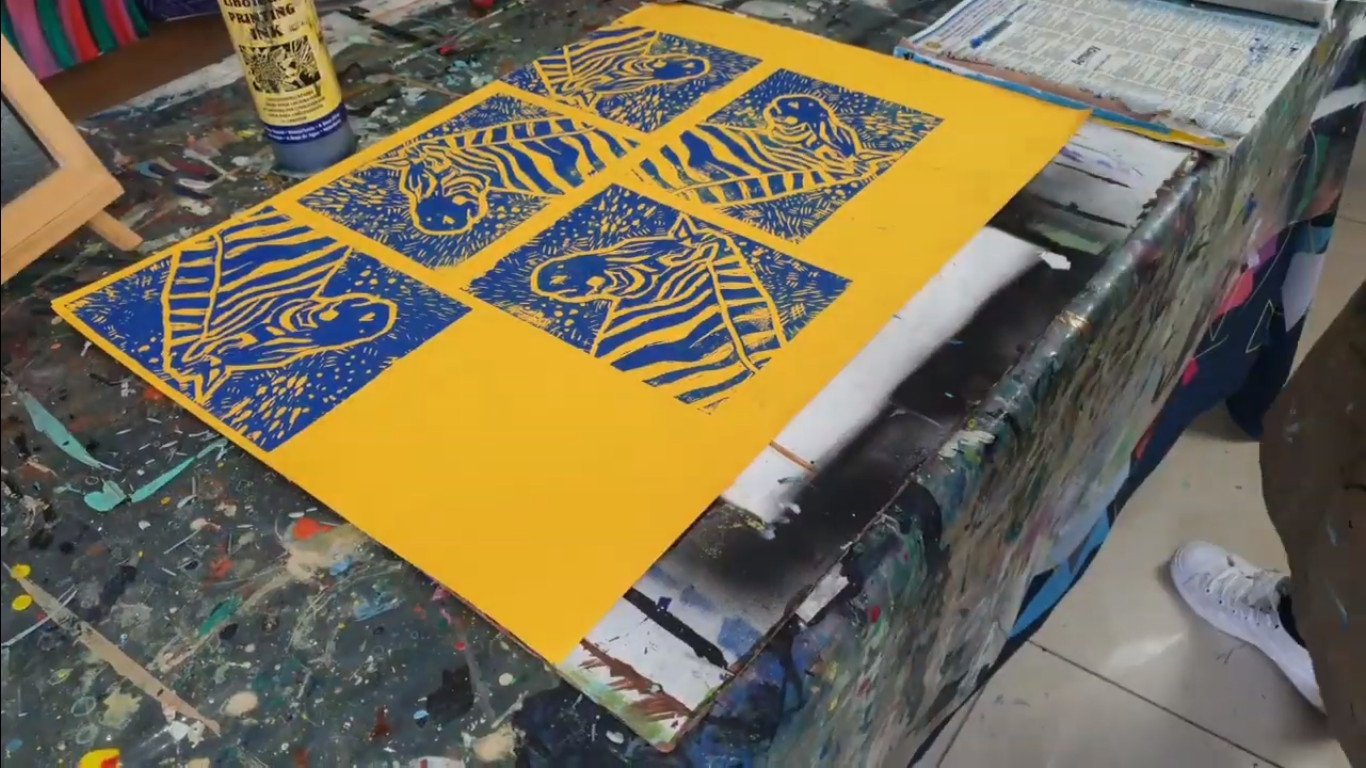
Okay, I’ve now done my wrapping paper. You can always press much harder, and keep your lines crisp. Keep washing your lino and keep on washing, printing, washing printing. I think this makes anything look like an awesome gift. Remember when you do wrapping paper, test the light and switch directions, so whichever way you wrap the people can see the zebra from the right angle.
I hope you guys understand the basics of linocut now. Let the print dry for at least two days because lino ink is a lot like oil paints, it takes a long time to dry. When you are ready to present your art make sure it looks amazing. That’s it. I’m Lillian Gray, South African fine artist and this was a lesson on linocut and printmaking. I hope you guys are excited to learn and discover more about this awesome media.
Please like and subscribe to our Youtube channel, and check out our blog for more amazing art projects.