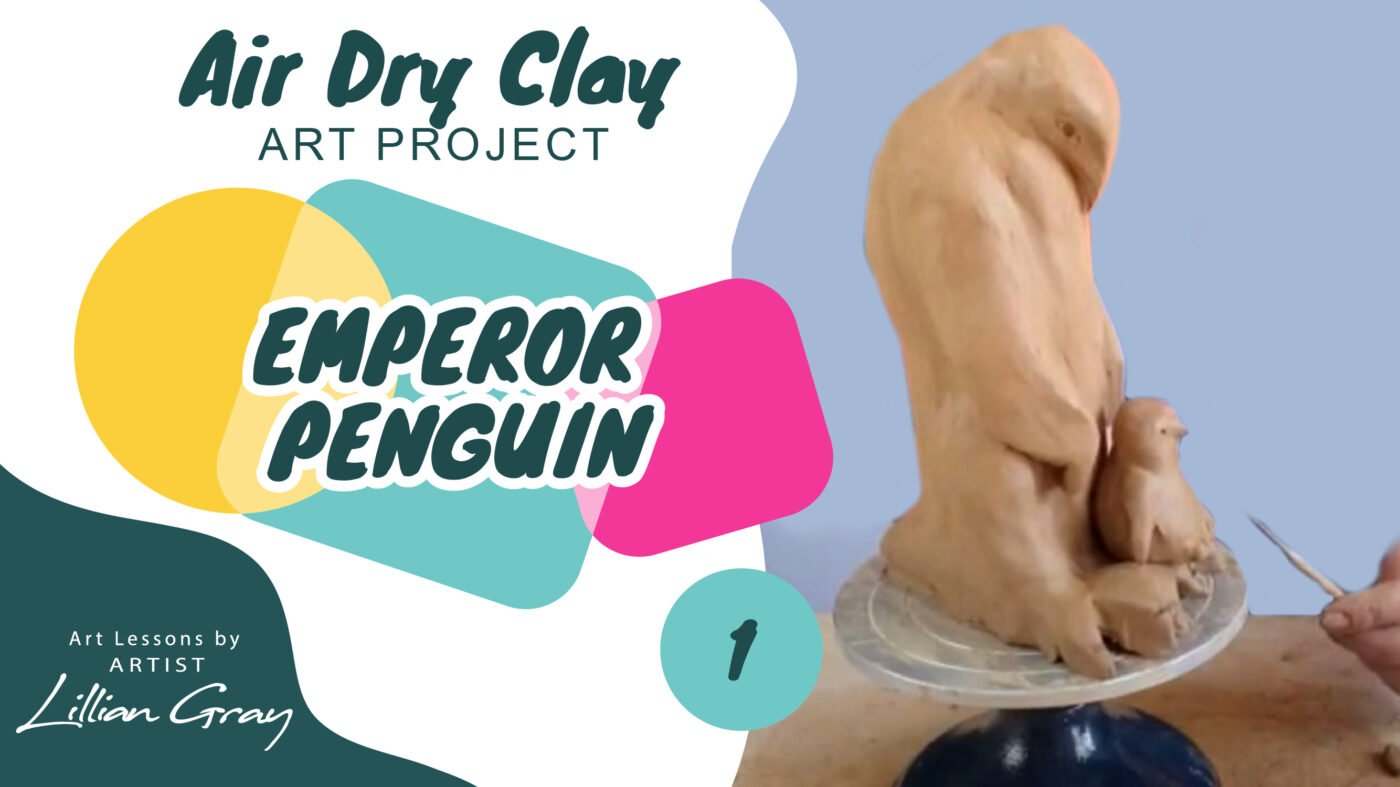
Kids Art Projects
Make a super easy Emperor Penguin sculpture with air-dry clay in only 6 Steps
Jun
Hi, I’m artist Lillian Gray and today we are making emperor penguins with air dry-clay. Before you guys proceed with this project, please make sure that you have watched my other video on the basics of working with air dry clay, so that you guys know how to roll a slab, how to wedge your clay, how to make slip and, how to do different joints. Okay, let’s get going.
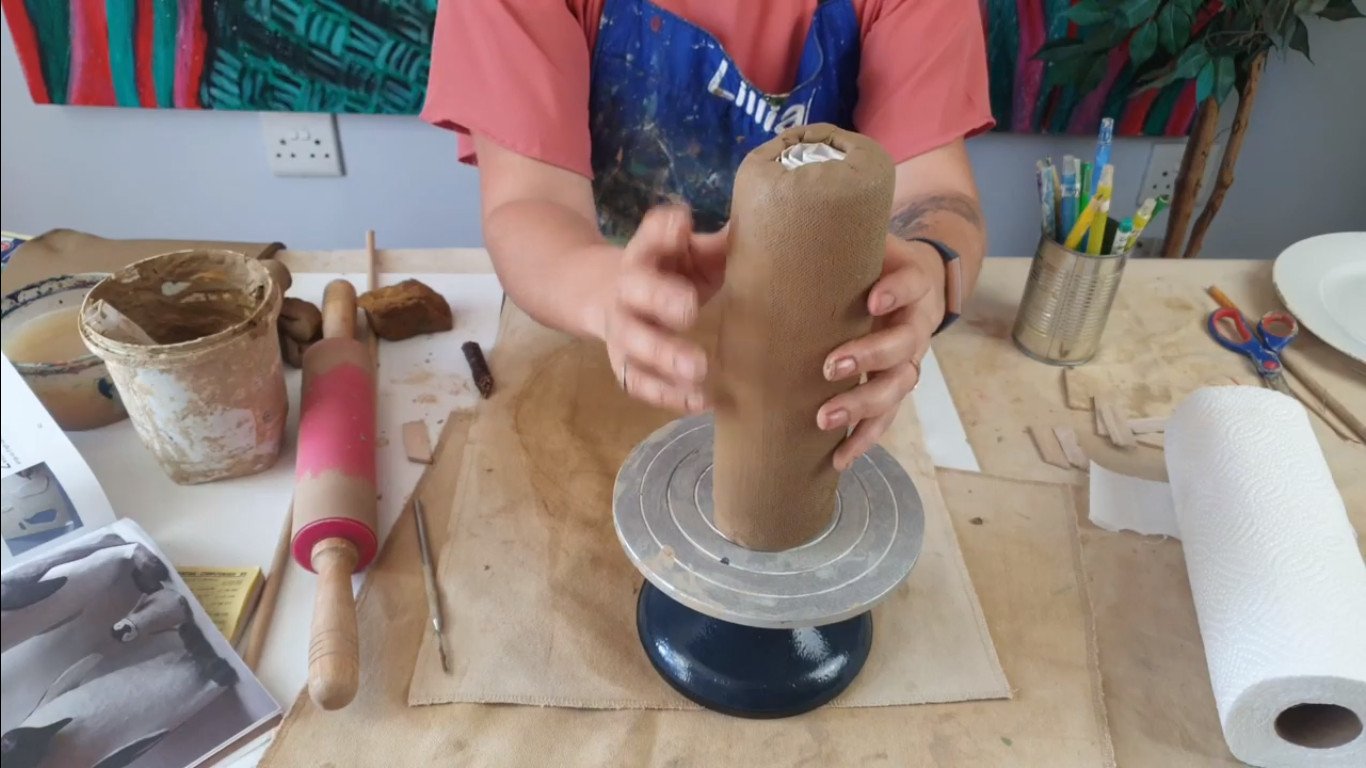
Step 1: Making the armature for your penguin
The first thing you need to make is going to be the inner of your sculpture which is called the armature. For this project, I’ve just rolled thick paper and taped it together. There are various things you guys can use, you can use newspaper to do this, you can maybe stuff an old toilet paper roll or paper towel rolls with things as long as you just have a strong structure.

You don’t want it to be too solid, so it must have a bit of a bend, because your clay is going to shrink when it dries, and it needs a little bit of mobility. After day three of the clay drying, you will be removing this from your sculpture.
Step 2: Wrapping your structure in the slab
What I’ve done here is, I’ve made a slab. My slab is quite long and I am going to try and wrap my structure in my slab. To do that I’m going to be cutting just a straight line here. You can use a ruler or whatever you like and I’m cutting with my little pin. If you don’t have a pin you can use a kebab stick or a toothpick. I am now going to cut this side straight, where I’m going to start.

Note that I am NOT cutting those two sides I’m deliberately leaving them like that. Now I’m lining my armature up with my clay, it is absolutely in line.
I’m going to start lifting. Note that I’m working on cloth, I’m not working on plastic. You want something that ideally absorbs some of the moisture of your clay and I’m going to bend this around. I’m going to kind of measure, boom there it starts reaching so my other piece of clay.

I’m just going to give it like an extra centimeter and cut. I’m now going to remove this part of the slab, and I am going to prop up my cylinder. Basic principles of clay, whenever you join something you have to scratch. I am scratching wherever I’m going to join. I scratch on both sides. I’m adding slip which is like the glue of my clay. I am gently going to start working this in.

Did you guys know that emperor penguins are super tall? I bet a lot of you’re thinking, Ooh, Lillian
that cylinder is too long for making a body for a penguin, but they’re actually the height of a six-year-old child.So they’re quite tall, which is like just over a meter, 115 centimeters in height.
I am working this in and if I need my sponge, I’m going to be using my sponge to make sure it all goes down smoothly. The idea is that you won’t be able to see your joint at all, and the idea is that you are going to not have any air inside this joint. Remember air is the enemy of clay. It makes your clay burst and crack. We don’t want that.
I’m kind of making sure that my cylinder is now nicely joined. We’re now going to close off the top, so don’t push too hard but you start off gently, moving this in, trying to close your cylinder. We’re not closing it all the way because we are still going to add our penguins head, but I’ve just kind of squeezed here, flattening this out. You guys can see that.
Step 3: Making the body parts for your Emperor Penguin
We can now make all the other parts that we need to complete our penguin.
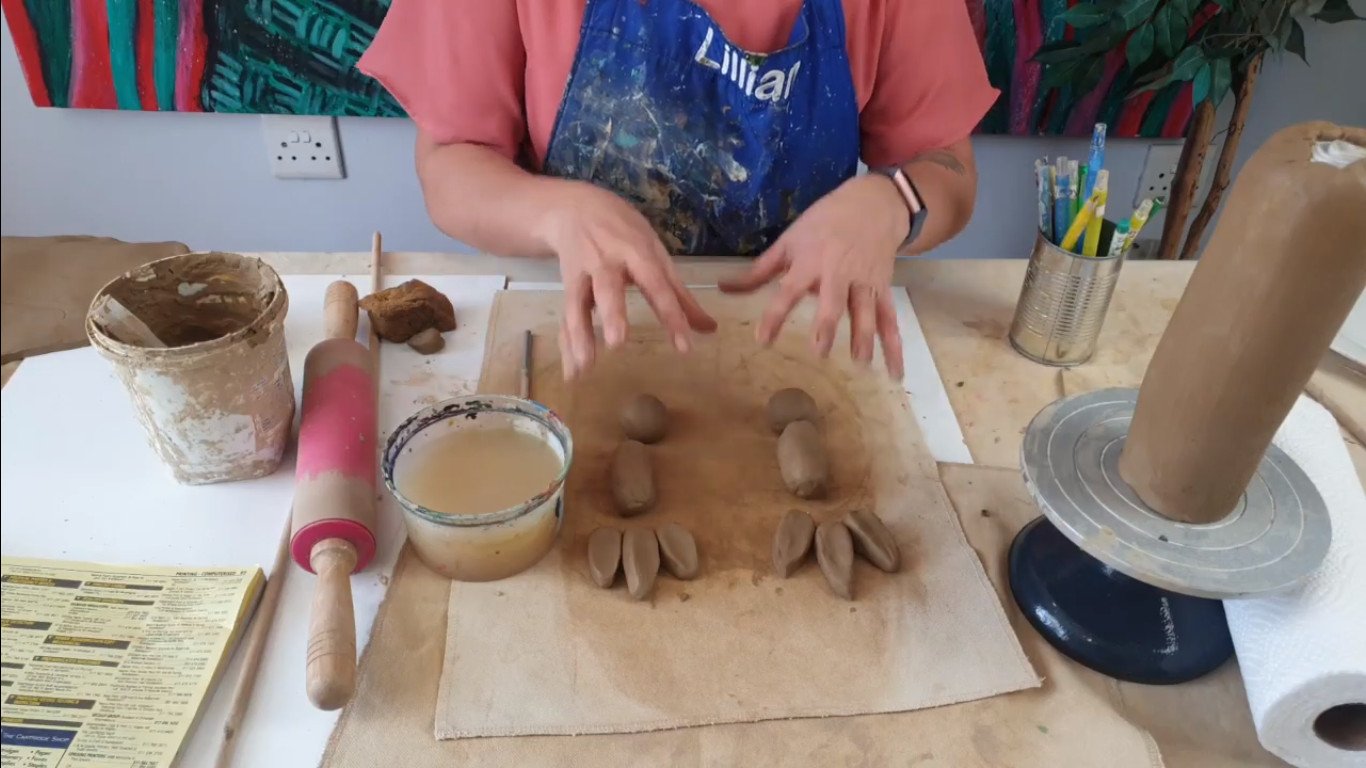
Making the legs using basic shapes
I’m going to start by making my legs. They’ve got really strong legs because they survive in the Arctic. Remember whatever you’re going to build, it’s going to consist out of your basic shapes. You’re basically just going to be using your five basic shapes to create whatever. That is going to be your circle, your oval, your triangle, your rectangle, and your sphere.
If your clay gets a little bit dry and it’s not so malleable, just sprinkle some water on it just get it moving again. You don’t want to have a mud bath. I’m basically going to start building my legs, which is going to consist out of my hip joint, the actual leg.
Making the hip, leg, and feet for your penguin
We’re going to make the feet separately. I’m now going to make the feet. My feet are going to be teardrops. They actually have quite massive feet, these emperor penguins. They have massive feet because they have to cradle their egg or their little baby off the ice. The whole egg or the little chickling sits on top of the feet. It’s like a little nest, and they take shifts, mom and dad to go hunt and find food.
I’m going to be making my three teardrops. I just want to show you guys here, you’re inner toe is actually just a little bit longer than the outside ones. We are just going to be making that. So this is your basic structure. Hip, leg, feet, and you’re going to repeat this because you obviously have two legs. One leg would be weird.
We are taking this to the sculpture. I’m going to bring back my cylinder, we’re going to scratch and join. I’ll show you guys how to join all of those together. Planning is a really important part of art.
I’m just going to cut a hole in here and see. My neck is going slightly forward and I’m just going to mark out where I want to join it. Okay so I’m going to be joining those. I’m going to be scratching both sides. I’m going to add slip and then I’m going to work it in with my fingers. Then we’re going to repeat this for the other side as well.
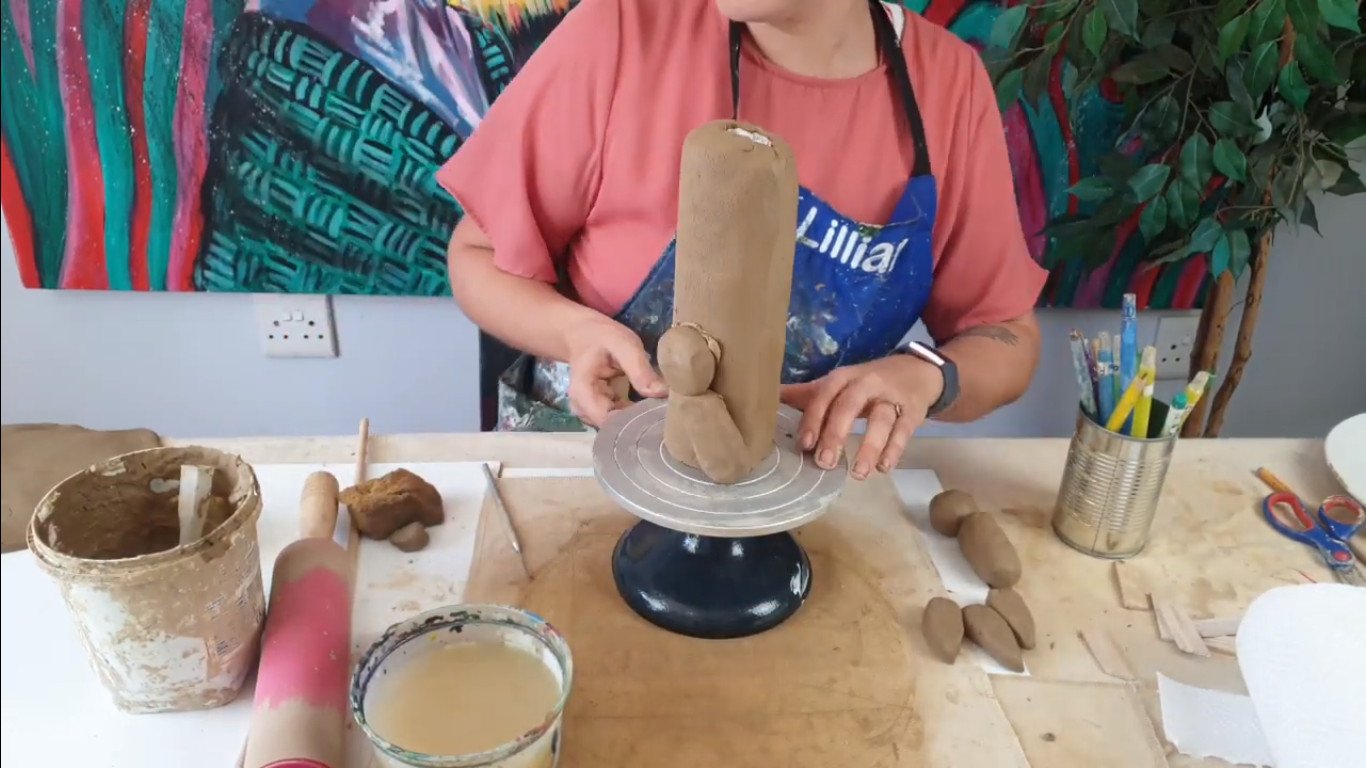
I have joined it and now I have to work it in. Before I start working in this side I’m actually just quickly going to do the other side so he’s going to look a little bit like R2D2 like an elongated R2D2.
Make sure that your two hip bones are on the opposite sides of each other and the same height. You don’t want a wonky penguin. What a weird-looking penguin. We’re now going to work in his butt and make his hips look all natural.

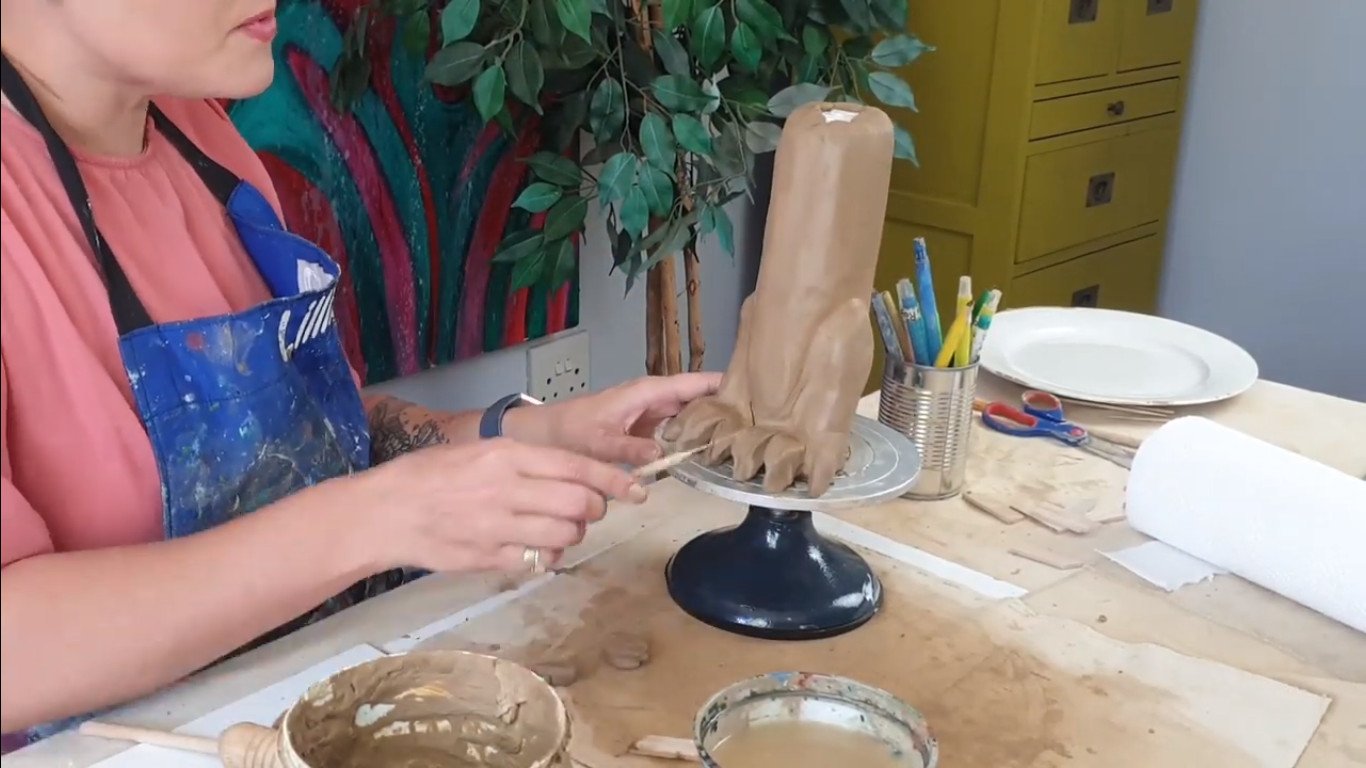
I’m also going to scratch here in the front and join our beautiful big feet. I’m going to start with the two middle toes and get those ones really aligned. They really do have big feet. I know these feel way too big but google it. Their feet are way bigger than their head. I’m just going to merge in this one toe.
I would also recommend, you don’t want flat feet like a dancer or like a chicken. They actually curl their toes a little bit. I’m just going to curl them a little bit like that because remember they’re trying to lift the chick off the ice. If you’ve made your toes too big, simply cut off a piece with your little pin.
Remember, we don’t freak out when our project is halfway, because our projects look terrible in art when we’re halfway. Sometimes when I’m painting a human, it looks like a freakin alien when I’m not done yet. And now your penguin is going to look a little bit weird, a little bit like a monster. Don’t freak out about it. There will be lots of times to freak out later in your life.
Don’t waste your energy on it, it looks weird now and even mine looks weird. What’s going to be important here is your V, so these claws are coming from that leg and these claws are coming from this leg. So you just want to kind of show that V. You can use anything to just scratch that V in. Straws works. I love working with metal straws as well when I work with clay.
I’m using a piece of wood here which is actually the back of an old canvas wedge. It works really well. Their feet are really atrocious looking, I mean it’s not it’s not like they’ve got spas in Antarctica We will get to the detail of finishing the little nails and stuff. I think, for now, let’s just keep going with the structure of our penguin.
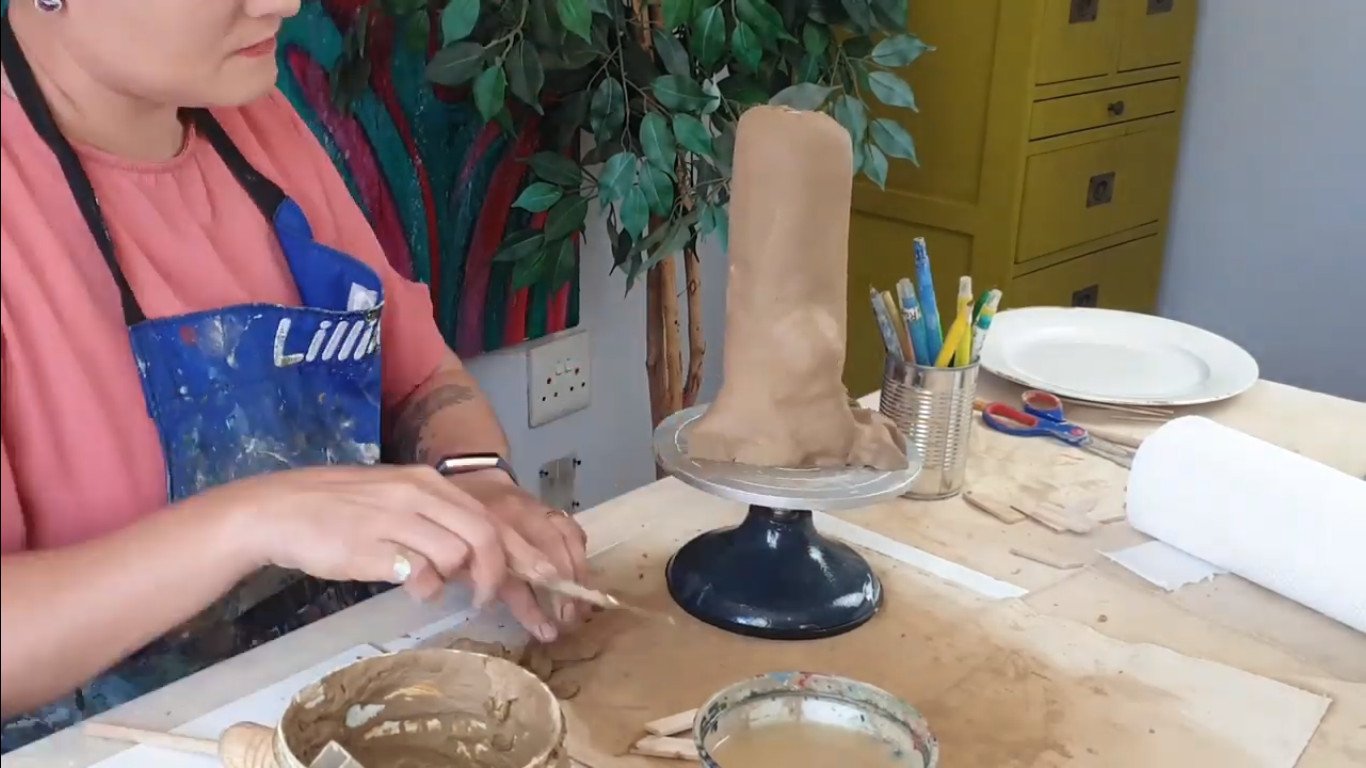
It’s nice to let your clay just sit a little bit, so it becomes like leather because you can really then work in the details quite sharply. I’m quite happy with these paws. Eventually, I’m going to have a little baby, sitting here on the feet. I’m not too worried. Everything’s worked off here now. Moving on, we are going to progress to …
Making the tail for your penguin
Let’s do the tail now. For the tail, we’re going to take some clay and, basic shapes again. It’s literally just a triangle. If your clay is a bit dry by now just dip it to make sure you can work with it. Don’t make it too muddy. I am going to be making my little triangle. I’m wedging in my hand. You guys can see that your body has all its basic shapes inside of it.

You just have to work with your body. Don’t fight your body. We’re going to scratch its butt. Scratch and slip as usual. And I’m going to add my emperor penguin’s cute little tail.
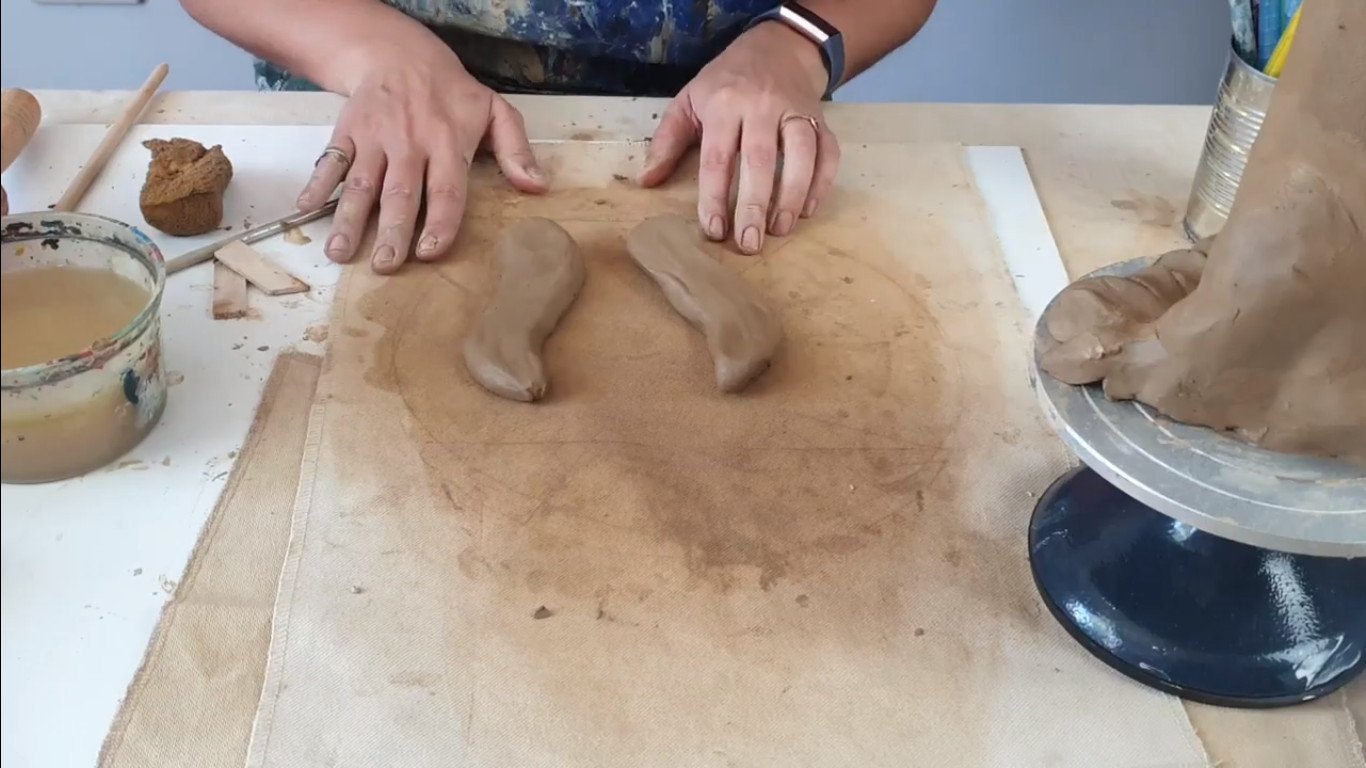
Making the wings for your penguin
We’re going to move this to the side and we are going to be making our wings. Then we’ll come back and join our wings. So basic shapes, once again to make our wings and, our wings are going to consist out of two spheres and we’re just going to join it in the middle. There are many ways to skin a cat.
You can also just take a slab and draw out a wing if you want. I find it’s much harder to get them symmetrical. I actually like working like this, because then you don’t need templates and all that nonsense. I’m repeating the step because I obviously have two wings.
I’m going to join them. The wings are a bit wonky and faint so make sure you get this bent area of the wings. You can work in your clay and really make sure that it joins properly. Make sure that it’s malleable, make sure that you’re getting all the air out.

These wings, see the little bend. I’m flipping it around and I’m making sure that it’s joined properly at the back as well. Now you guys just need to focus. You need to realize that this wing is going to be on the one side and the other one’s going to be on the other side. So they have to be mirror-view. I’m joining them, and now I’m not mirroring, because I’m actually just gonna flip it around. And I’m joining.
Now I have my basic two wings, They’re going to mirror each other like that.
I’m lining my wings which come in like that, and then rest here, just above the leg.
I’m just kind of planning and I’m just going to also plan that out on the other side.
If you scratch wrong it doesn’t matter, we just work that scratch back in. I’m going to just measure
here, and I’m going to see that I really like this. This is exactly what I wanted, so I’m going to scratch my wings, same principle, scratch both sides, the wing, and the body, add the slip and work it in with your fingers.

Make sure everything’s worked in and you can add these cute little shoulders. They really slant.


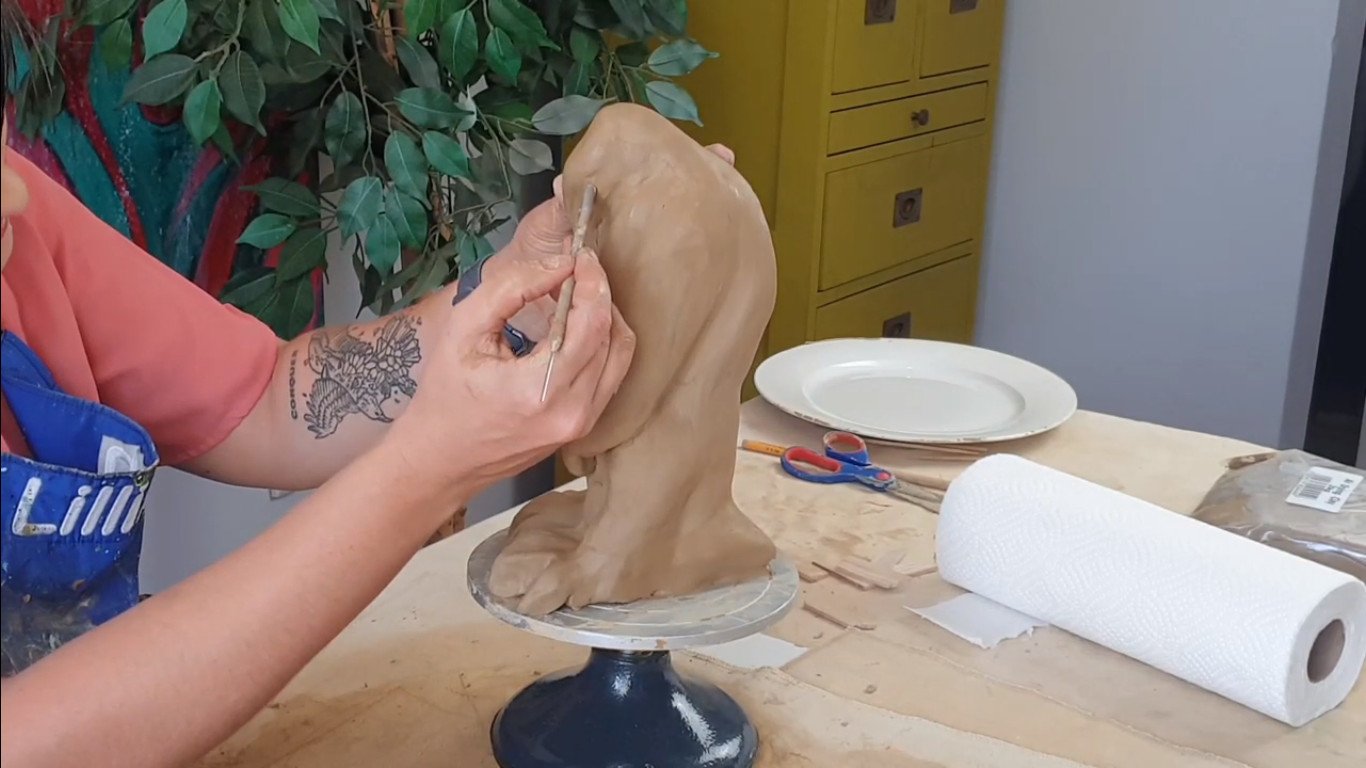
Joining your penguin’s head
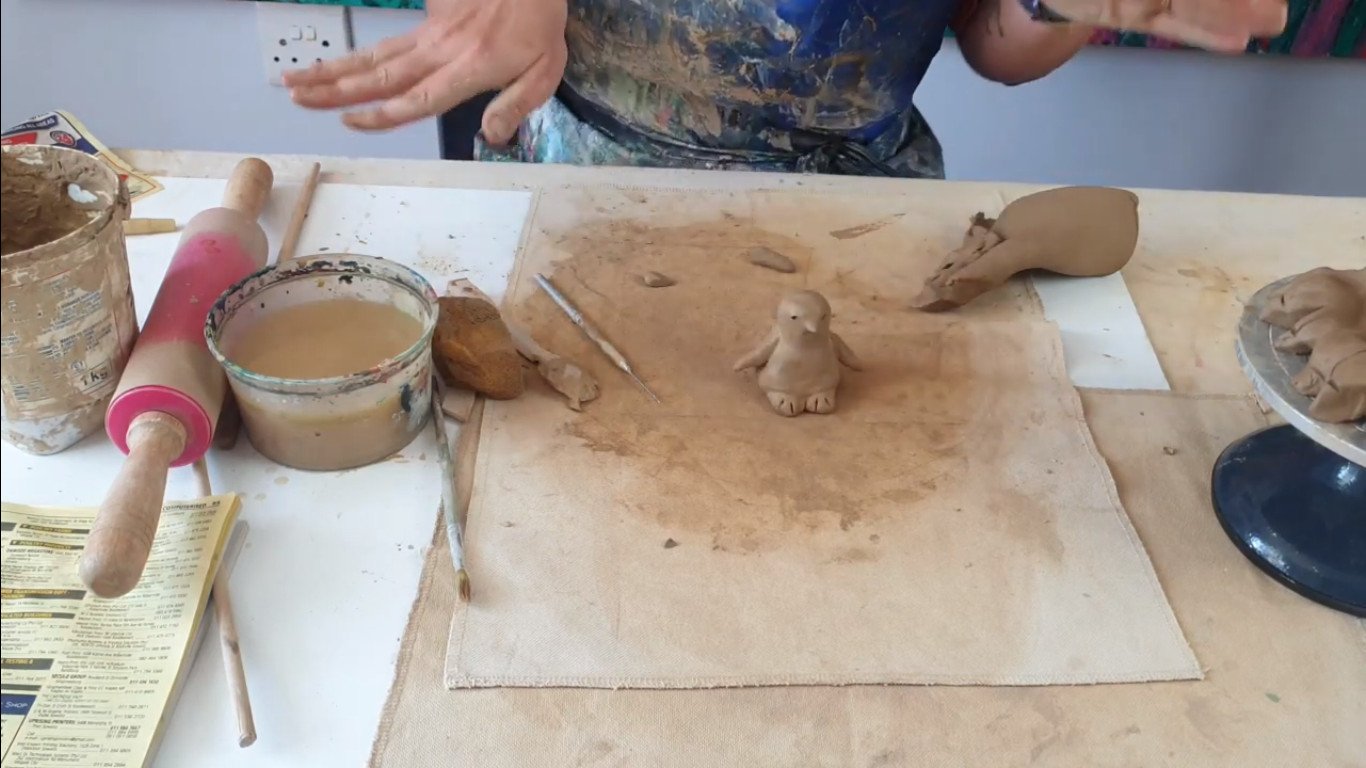
We’re now going to join the head. I’m going to make a parent guarding its little babies. So he or she will be looking down to make sure the baby is okay. The head’s going to be slanting off like that. Now, the heads are actually very small, much smaller than the feet. Emperor penguins’ proportions are a bit weird. We’re basically going to be putting this one here. You need to make 100 % sure that you scratch this step really well. Add enough slip, because you do not what the head to slip off.

I’m ready to add my head. I’m also now actually just going to wedge the beak.

I’m going to squeeze my head-on. And he or she is lovingly looking down. For this back section, I’m now going to fill in clay here. The same principle, I’m gonna use a basic shape which is just an oval, which it’s gonna start giving me the neck. I’m gonna work it in properly and I’m going to make sure that I use more than enough slip. You can always remove some slip, you know just scratch it all with the stick or something, but I really want to be able to work this in now.

What must I do if my penguin is too upright?
I’ve got the basic structure of my emperor penguin. It’s still a bit too upright, a little bit like a robot. I’m just going to put in a bit of a hump here at the back. and The same thing applies, you are going to take some clay, we’re going to scratch on both sides, slip and join. Just to get that bit of a hump as she is crouching over.

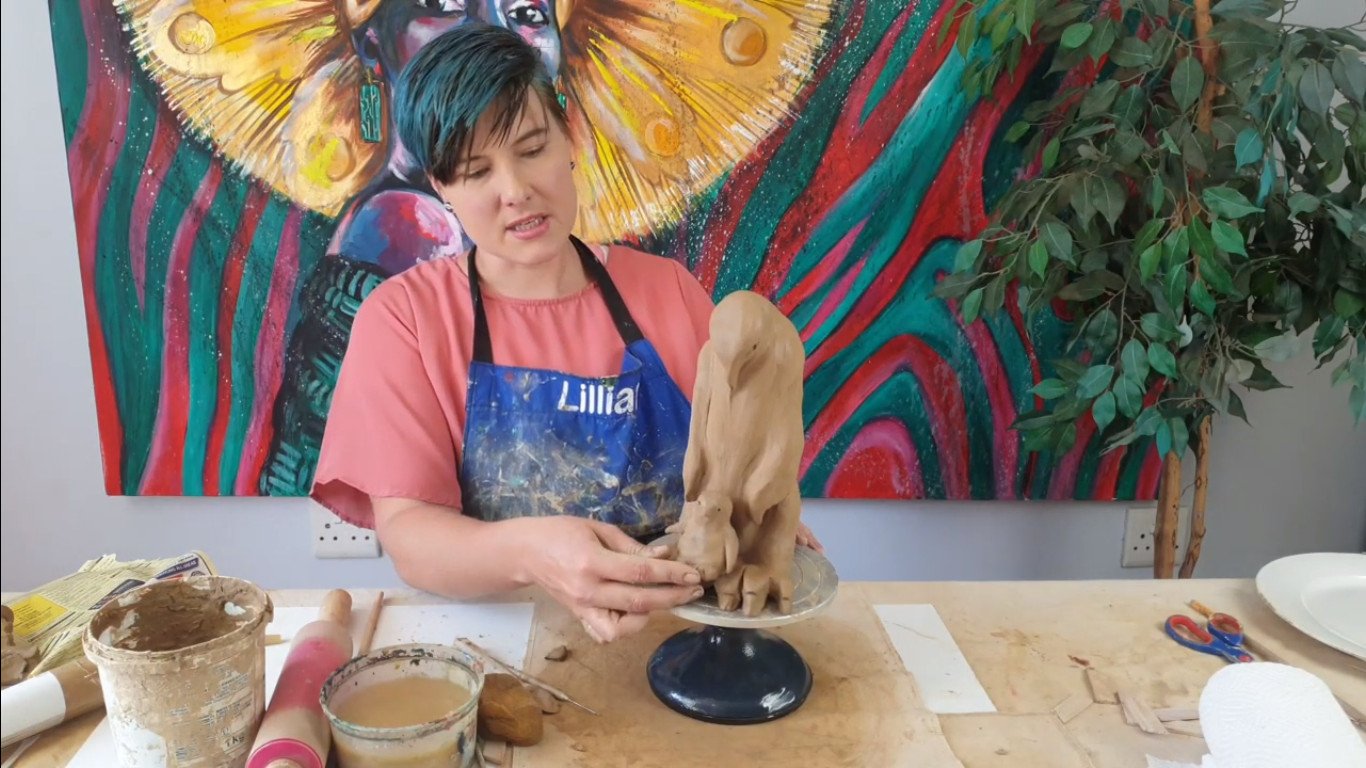
Step 4: Tweaking and cleaning up your mama penguin.
Now you guys can really just tweak and make sure that you’re happy with the structure. Remember your sponge, you want to smooth out all your stuff now and really just finish off your mama penguin quite well. Make sure she’s clean, make sure she’s smooth and everything is worked in.
Don’t skip this step. I know some of you are lazy, you don’t want to do the finishing off. You’ve spent all this time making it, all the supplies, and spending like three or five more minutes, you really get a well-crafted project. We’re going to be doing the eyes. I’m using the back of my pin here, you can also use a pen. I’m going to be making sure I have my eyes at the exact same height and the exact same side. Then they’ve actually got a bit of a little triangle on both sides.
You don’t want one to make such complicated eyes. Just make two dots. Remember, you can use a soft paintbrush to get into areas when the sponge is maybe a bit big. Make sure you’ve worked it off nicely.
With our feet, if you want, you can make some claws. They’ve got quite weird claws, so if you want to do the claw you can. If you don’t want to do that just leave it. Now let’s put this aside and make a baby.
Step 5: Making the little chick
We’re wedging some clay. We’re making our baby. Just keep your proportions in mind. She’s very small, not as big as the mom. There’s no armature inside and it’s basically just two circles. Two spheres, a small one and a big one. And we’re going to add little feet and little wings. And that’s basically going to be it.

First up you want to take your spheres, and you want to just try and push it, so it’s a bit more of a teardrop, not completely a circle. I hope that makes sense. She’s going to be thinner at the top and wider at the bottom. We are going to be scratching, adding slip. Like a little snowman and we’re working in with your finger, this tiny head.
I’m just going to make two tiny little feet, which are also just two circles. I’m gonna plonk it here, and you can just take your toothpick or pin and just give it the tiny little toes.

She also has three toes on each side, like mom and dad and I am going to take my fingers and just start pinching a little beak.

I’m also going to take my little pin and, I’m going to pin the two little eyes, and just wiggling a little bit.

There is my little baby penguin. We are now going to add the little wings. Make sure you’ve worked it off nice and smooth. The same principle, you’re going to take your sponge or your paintbrush and you’re going to be working it off quite nicely.
Let’s add our wings. I’m literally just going to roll the worm and just add two baby wings. Make sure they’re the same size, and then you’re going to scratch, scratch, scratch, and slip, slip, slip. You can decide, you can either curl the wings in or push them out. I think she looks a little bit more cute and helpless if they’re a little bit out. That’s what we’re going to do.
Next up we are going to turn her around and we are going to give her a little tail. You can either add a triangle, but if you’ve got enough clay you can just finish the butt. I am going to make a triangle.
So there is our little penguin. Just make sure that the cavity where your baby is going to sit at the end of this, is the right size and that it’s actually going to fit. I see my tail is too long, so I’m actually just gonna break off a little bit of this tail, make the tail much, much smaller, and make sure that my little penguin can actually rest on Mama’s feet.
That is going to be my goal. I’m not going to put these two on top of each other when I let them dry. They’re going to dry separately, but I just need to make sure that she’s actually going to be able to fit. I’m pretty sure she can sit there. I’m going to clean her up, just make sure her claws are still nice and clean. That’s it for our beautiful little emperor penguin. Mother and child or father and child sculpture.
Step 6: Packing and drying your emperor
I’m now just going to quickly show you guys how to pack this one away. We want to store them separately, and not let them dry together, on top of each other like this.
I’m going to be putting my sculpture on some polystyrene and I’m layering it with some kitchen towel paper. Paper towel is going to absorb any of the excess water that’s going to evaporate off the clay.
I’m going to gently just take it off my stand and plonk my baby next to it. I’m going to cover it with plastic, two layers of plastic. One from the one side, one from the other side.


You can give them some kisses goodnight. You are not going to see them for 3 days.

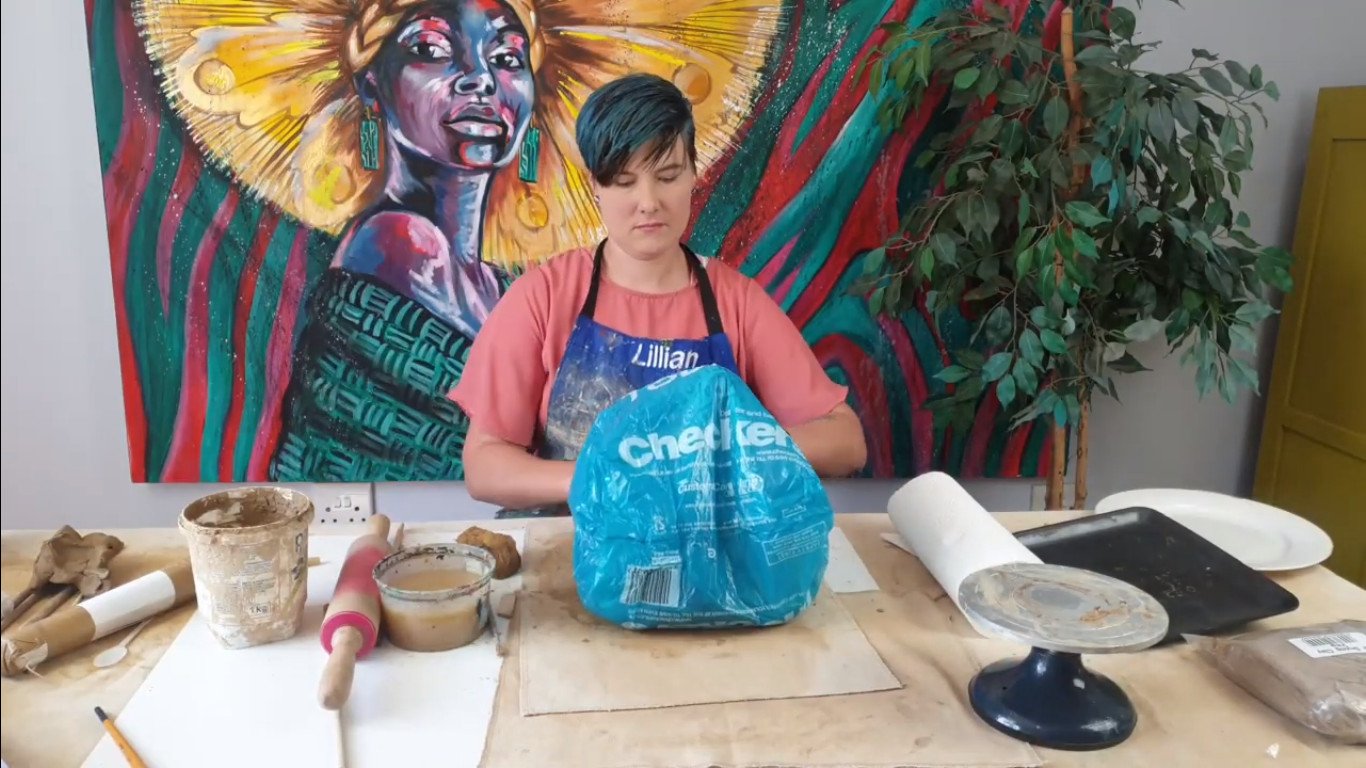
This is going into a dark cupboard for at least three days, then we’re going to take the plastic off, we’re going to open the cupboard door, let it dry for another few days. It has to take about a week for your sculpture to dry. Don’t speed up the drying process, don’t rush it.
Never put it in direct sunlight it’s really bad for your clay, it’s going to crack. I want it to take at least a week. If you are in England and it’s really cold and rainy, it will take even longer, but that’s good. Slow is good. Please don’t rush this process. We don’t want this to crack.
I’m artist Lillian Gray. See you next time.
Also watch my video on finishing of your Emperor Penguin sculpture.
Check out our blog for other amazing art projects.