Kids Art Projects
Mixed Media Art project with 5 Pro tips from amazing artist Lillian Gray.

Jun
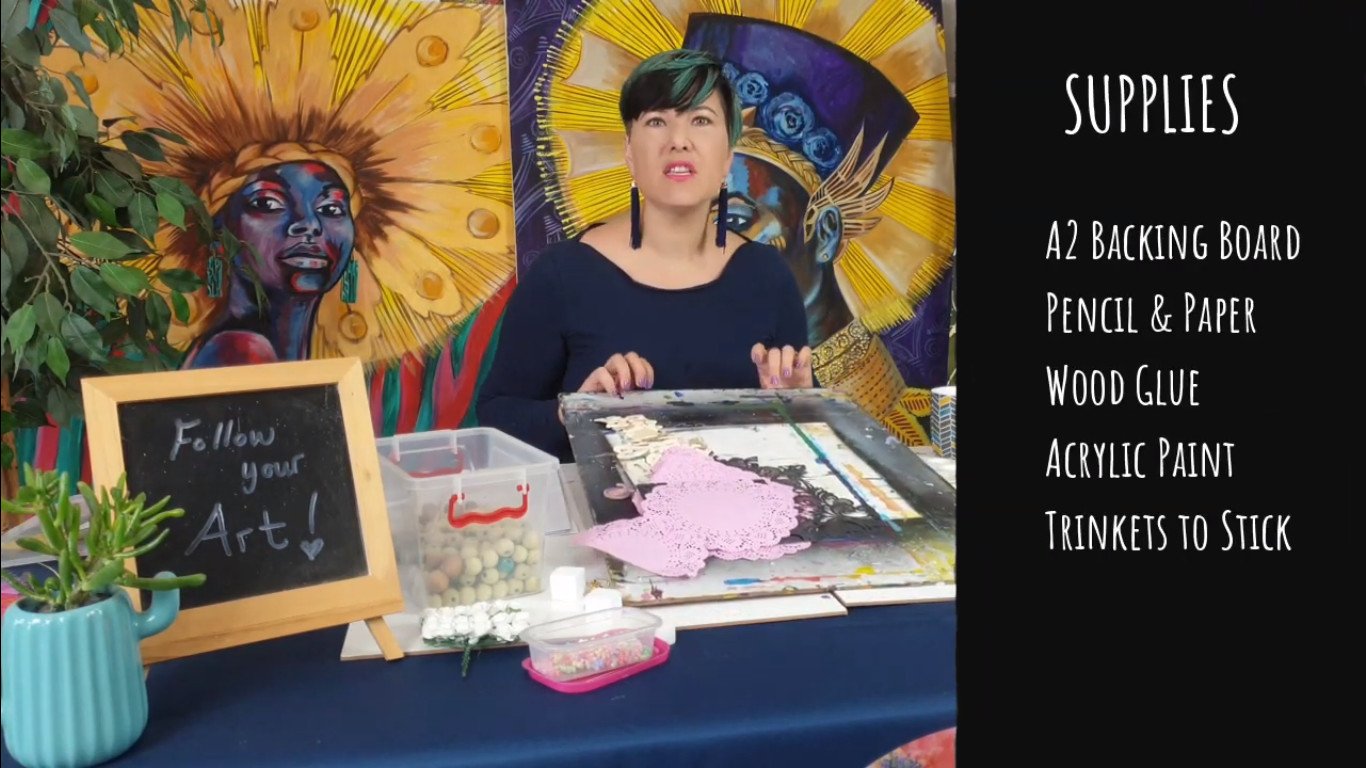
Hi, I’m Lillian Gray, South African fine artist, and today’s lesson is all about mixed media.
For today’s project, you’re going to be needing quite a few things, well there’s essential stuff and then there’s nice-to-have stuff. So I’d say the essential stuff is having a proper backing board you don’t want to be too working on a canvas because a canvas can sag, you want a sturdy board.
You will need:
- A2 Backing board
- Pencil and paper
- Wood Glue
- Acrylic Paint
- Trinkets to stick
Pro tip 1: Plan, plan, plan
I’m using an old masonite board that, used to be a drawing board and that’s just nice and hard. You can really glue some heavy things onto it. I’ve also have paper and a pencil to do my planning on. Then I have glue, acrylic paint, and an array of stuff to stick down, and it could be anything. it could be recycled plastic, it could be junk that you found, it could be old buttons from Grandmama’s tins
It could be:
- Lace
- plastic flowers
- gifts that you didn’t like and want to tear apart,
- an old clock to get some gears.
- Whatever you like to put into your mixed-media.
One of my pro tips is planning. What art really needs to teach you is to plan, plan, plan your projects.
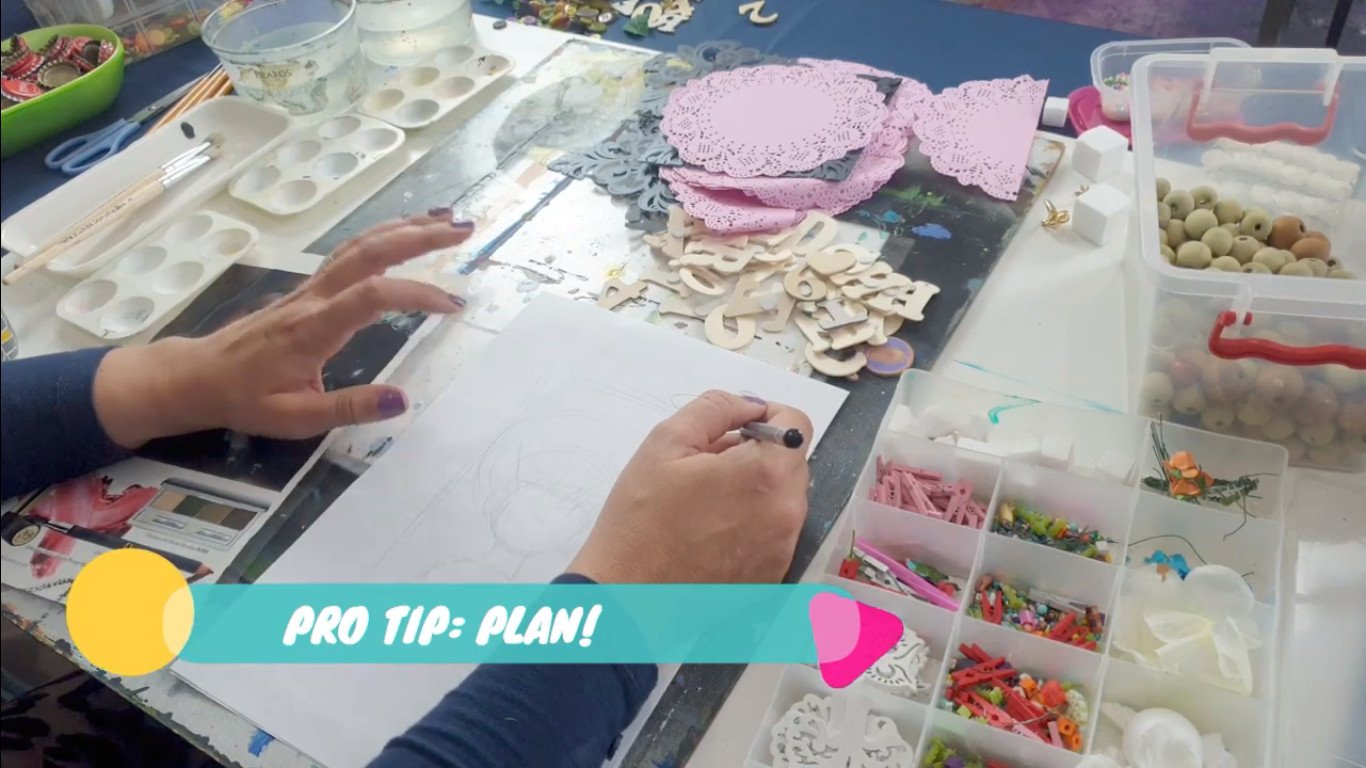
What is a scamp?
I’m totally aware that some beautiful oopses can happen, or halfway through you might want to change the project and that’s great. But it’s really important to plan with direction and know where you’re going. In the advertising industry, we use a thing called the scamp. A scamp is just a tiny little thumbnail drawing that shows you where you are going to place things.

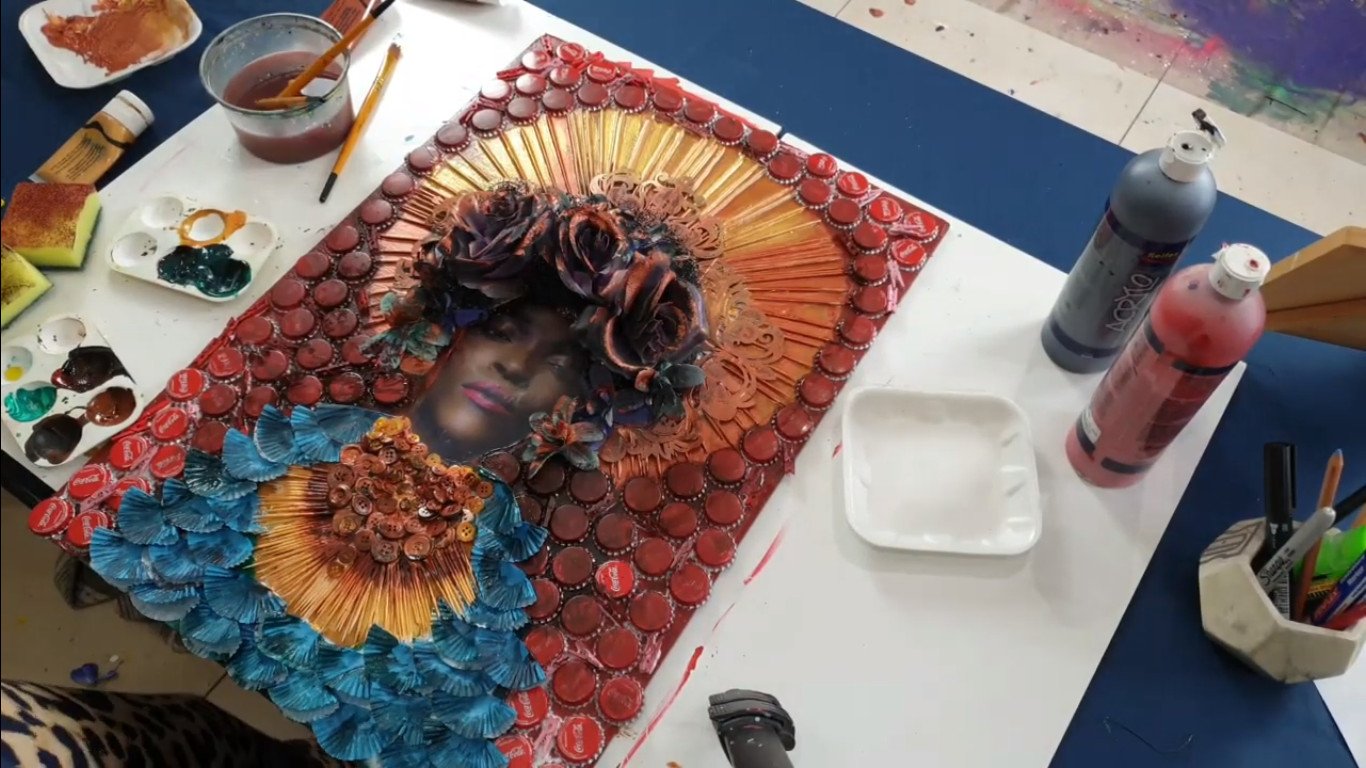
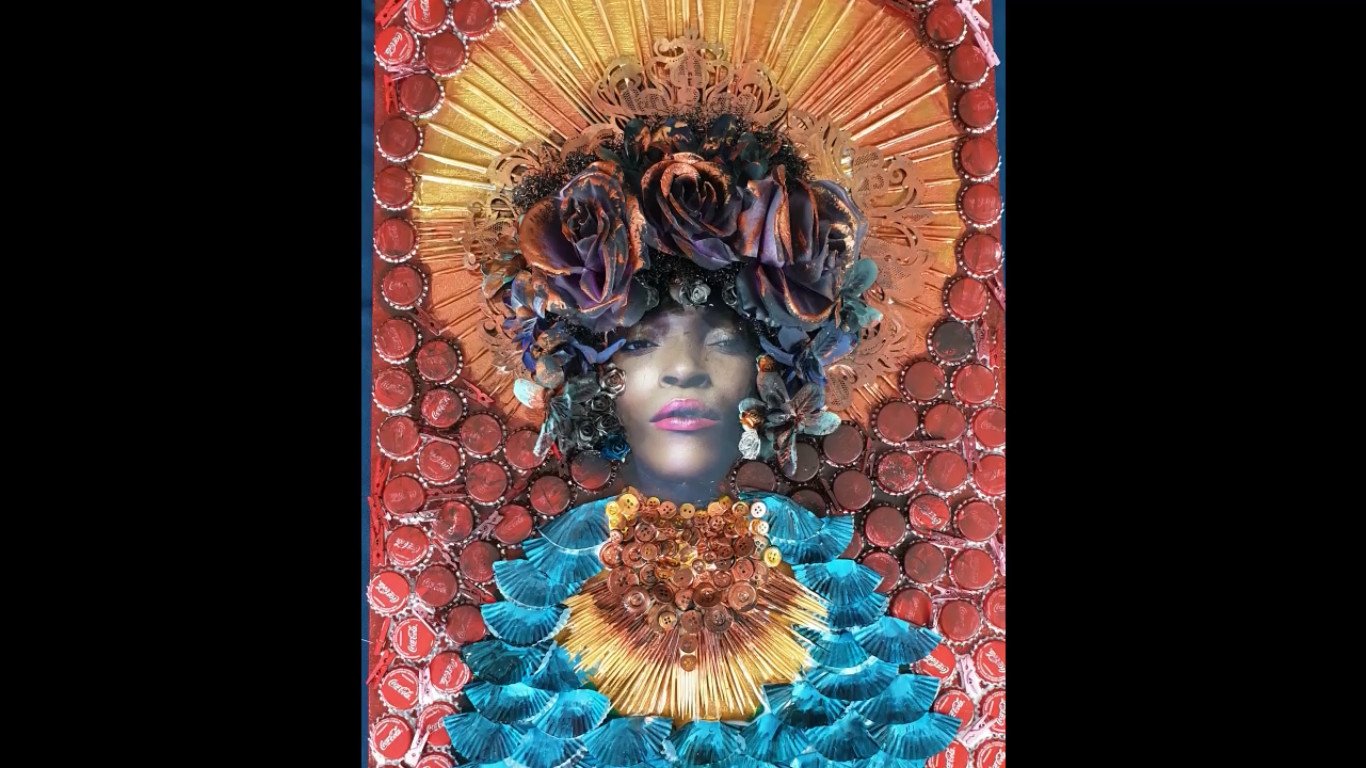
So for me, I have got my image, I would like to do Afrofuturism, staying in line with my current exhibition and series that I’m working on. So I’d like to know exactly what I’m going to be planning and where I’m going to be sticking what and what my focus would be. It’s very important that you resolve your composition in your scamp. You know exactly where you’re going to place what.
Something you’d like to avoid in, say for instance if this is your A2 backing board, is to have your little subject down here and all this negative space being lost. I’d like to advise you guys to place your object and really fill it. It’s much easier to work on bigger areas in mixed media than on smaller areas. Smaller areas really get tricky.
Pro tip 2: Laminate cut-outs in mixed media artworks
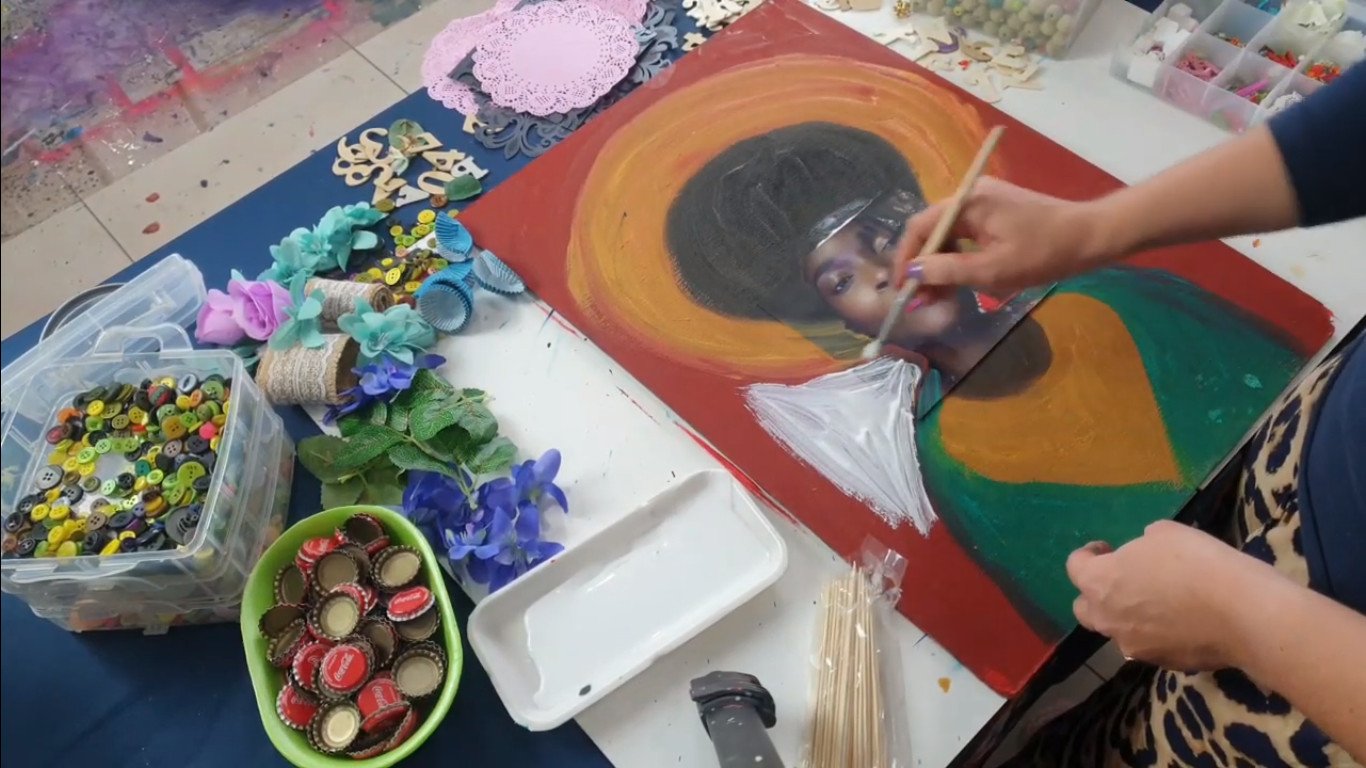
The pro tip that I’ve learned, doing mixed-media, is if I use something from a magazine cut out, I usually laminate it. My reason for this is when I drop glue, or paint, or an object onto this one while I’m getting really messy, I can simply just wipe it off and keep my magazine cutting really clean. If you work carefully this tip isn’t needed, but I’m quite an impulsive, rough artist so I know that I need to laminate my picture to keep it nice and clean. If you’re not using a reference from a magazine and you’re literally drawing and constructing everything on your surface, you do not need this.

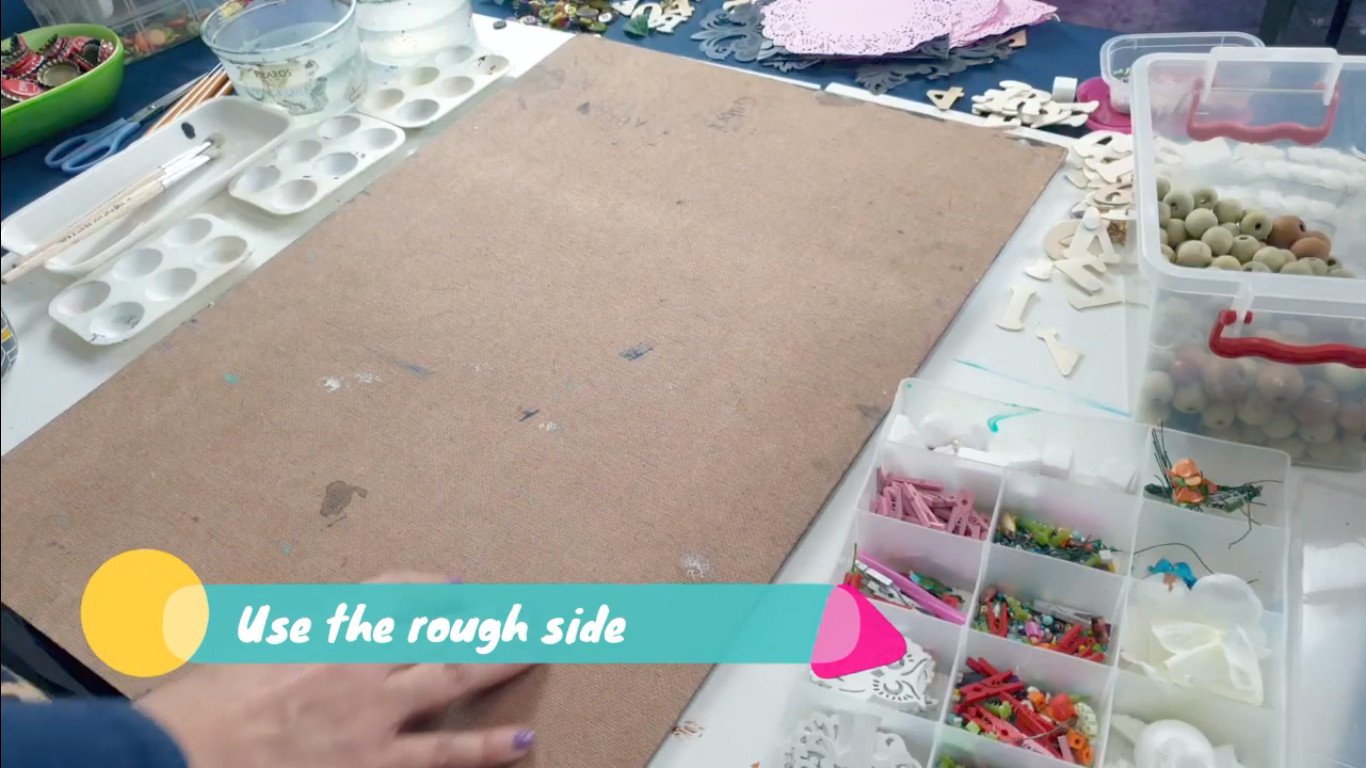
Once you’ve got your planning, you’ve got your images, you know what you’re doing, it’s important to now draw it out onto your backing board. Remember with your backing board, we’re just using the rough Masonite. The one side of your Masonite is usually coated and the other side is usually coarse and rough. We would like to use the rough side. The reason for that is the objects stick better. So, please don’t work on the laminated side because your objects will just fall off. So I’m flipping it around and I’m using the rough side of the board. I’m now going to draw out my planning and make sure everything is exactly where I want it.
Pro tip 3: Colour-blocking
Now another pro tip: Do not just start sticking. If you do not do this step, what’s going to happen is you’re going to have all these gaps in between all the objects you’re going to stick and it’s actually going to look ugly. It’s not gonna have that wow factor that you want. It’s really important to once you’ve drawn out, to colour-block. We are now going to colour-block just using cheap acrylic paint. It doesn’t matter what the quality of the paint is, you just want to get your colour on the board. You also want the course side of your board to really absorb the paint.
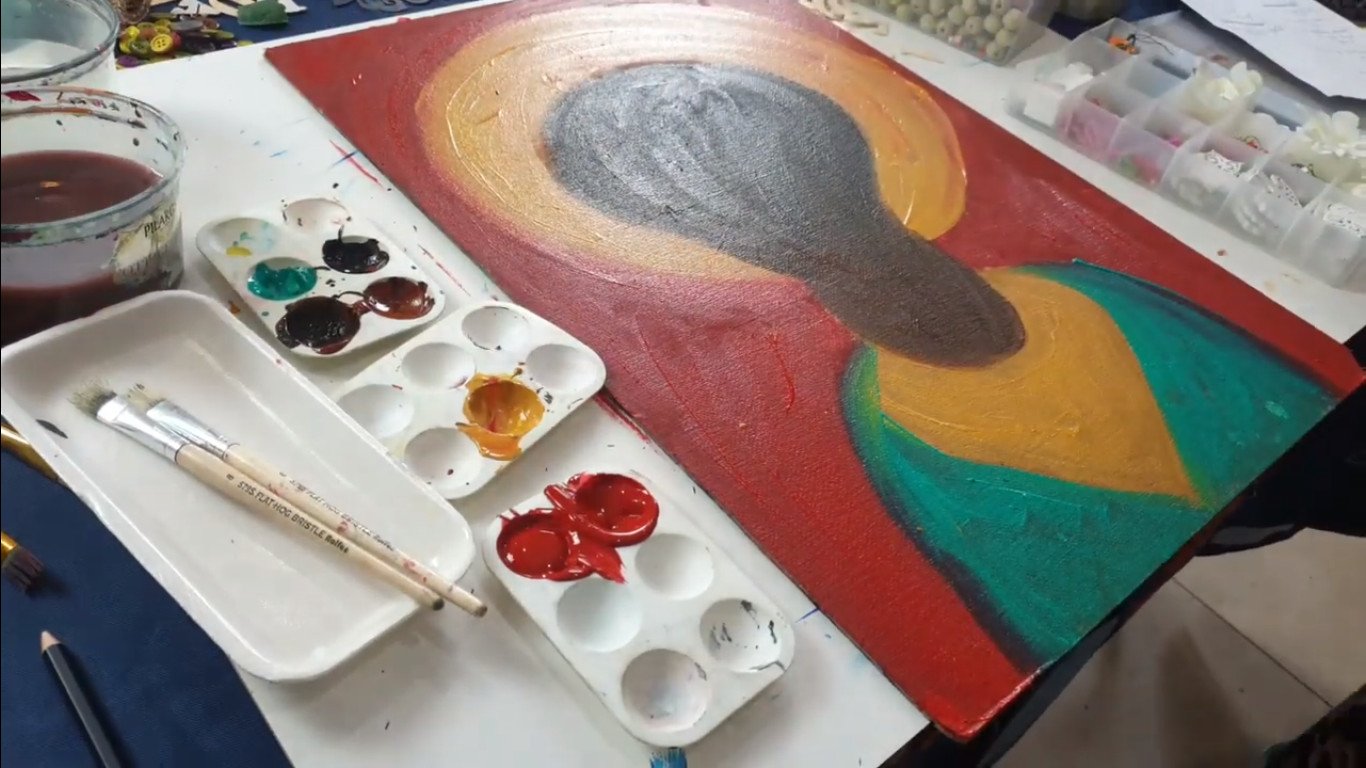
So now I have finished colour blocking. How do I know when I’m done colour blocking? When I literally cannot see any of the masonite board, everything has now been covered with paint. We’re going to let this dry and our next step is going to be to stick down the magazine reference in the place where we want it. And then all the happy sticking is going to happen. Now for another pro tip. I have to make sure my magazine cut-out really integrates with my painting. I’m also going to be adding a bit of acrylic paint, just overlapping with the magazine.
Once this is dry, you’re ready to stick. I would recommend that you guys start with a background and work your way forward. Usually in art, your subject matter is that’s closest to your eye is the most important. So you would like to stick that last. so that’s on top of each other. So that’s the last layer you’re going to stick on. So we’re going to be starting with our background and just watch me Naenae.
Pro tip 4: Do not just start sticking
Another tip that I would just like to say is only gluing a section at a time.
I’m using normal wood glue and quite an old brush that I don’t care about that much. You don’t want to spread glue over your whole artwork, because you’re only going to be doing one section at a time. Just glue that section, finish sticking that before you add more glue.
Just go a little section at a time. Also if you want to take a break in between then you won’t waste glue with glue drying all over the place. Just finish one section with your glue. Also rather add too much glue than too little. You really want your objects to stick.
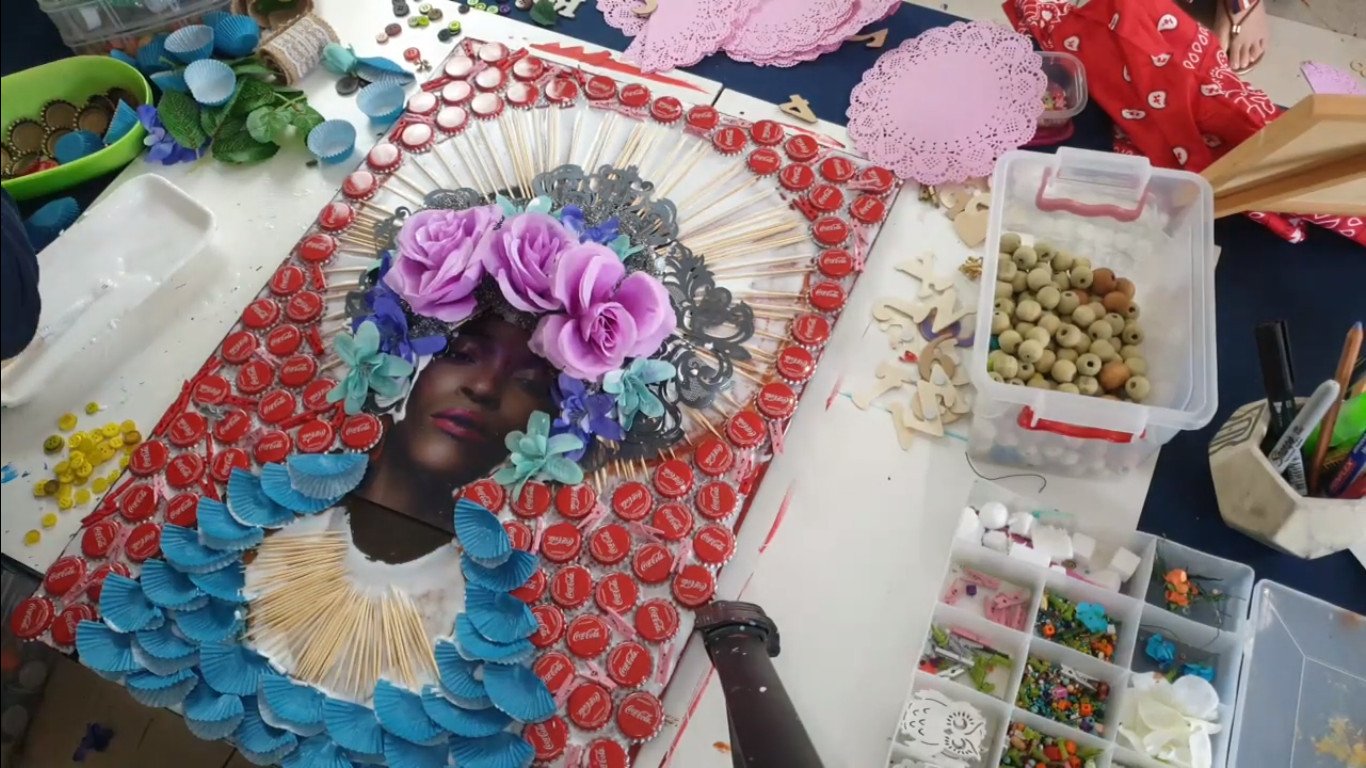
So now we’re done sticking, and we’re going to leave that to dry maybe for a day. Then I’ll show you some wonderful finishing touches to make it all really pop. So now is a good time to wash that glue brush otherwise you’re going to have to toss it away afterwards. Clean up your station, so we can just do our finishing touches tomorrow.
Pro tip 5: Adding the finishing touches
It’s dry now! You’ll see the white of the glue has dissipated quite a lot. The glue is now see-through so you can really see the textures. I’m going to show you some tricks that I use to make it really wow, and make certain things stand out. The trick is – less is more. Don’t overdo this step too much because you don’t want to cover all the work you’ve done. You just want to enhance some of it.
Okay, let’s take a closer look. I’m going to be spraying some of this darker. I’m just using the protective page so I don’t spray the area I don’t want to spray. I’m just going to go slowly.
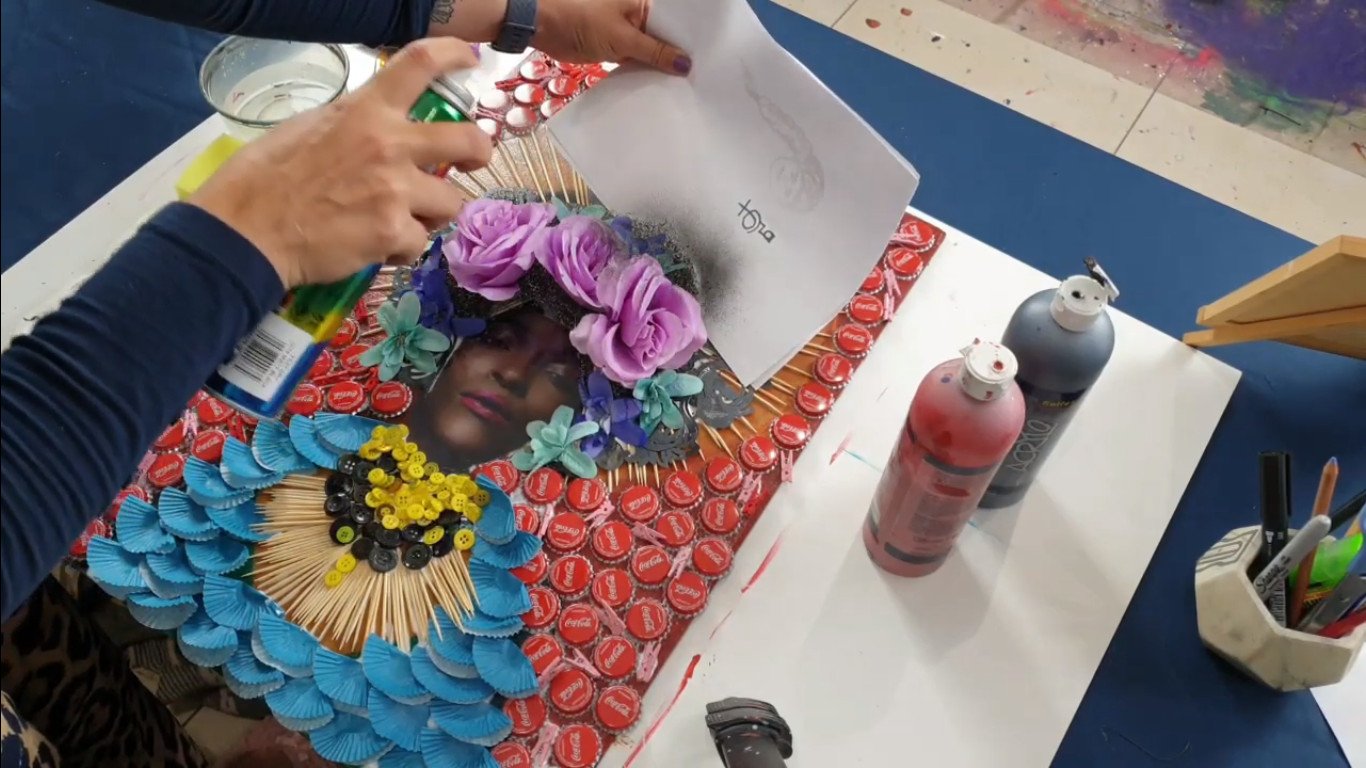
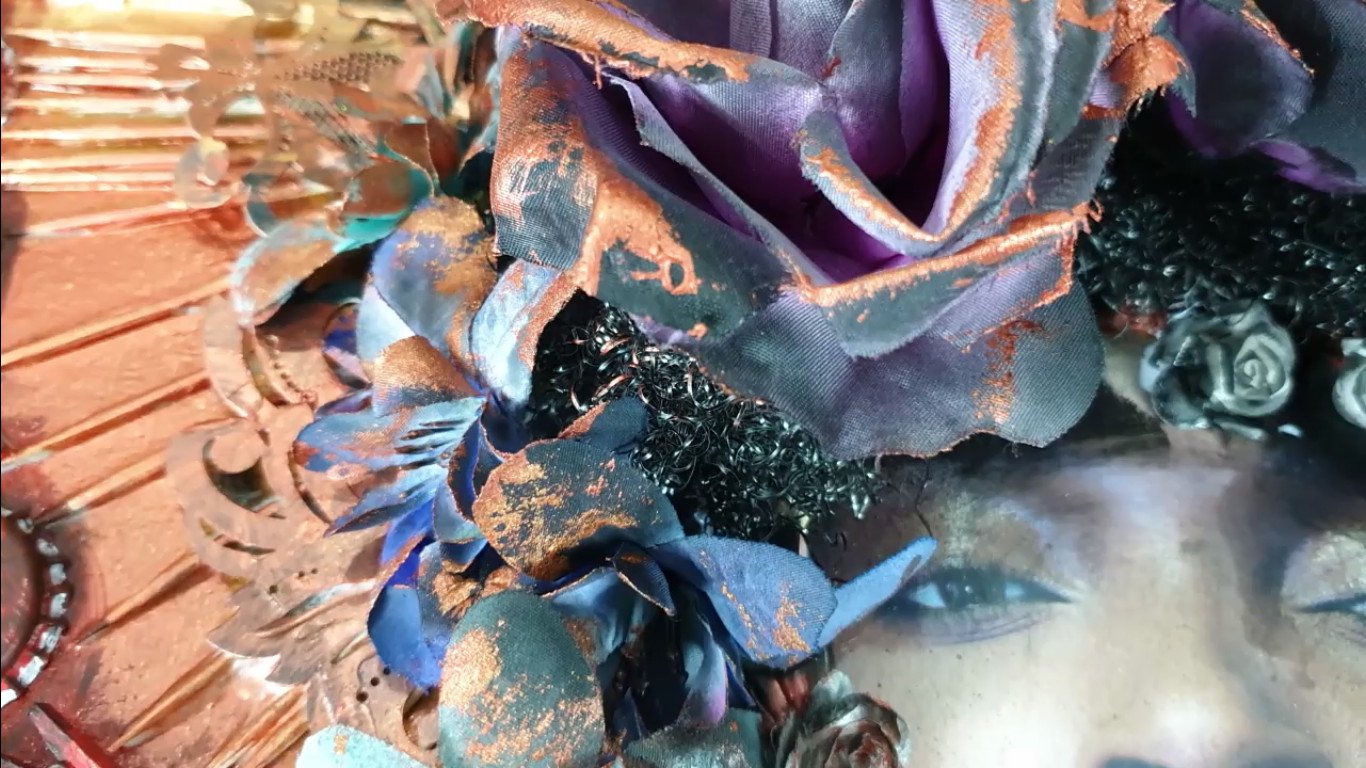
If you’re a child please let a parent help you with this step and remember to wear masks. Spray paint is quite toxic, except if you’re using those fancy ones that don’t smell like anything and are non-toxic. While I wait for the spray paint to dry, I’m going to be adding some gold leaf to the back of this crown. I am just using a light brush and I’m dusting it on. I’m not putting it on very thickly, because once again, you don’t want to cover everything you’ve done. You just want to make certain things stand out more and emphasize certain areas. For the halo, I’m definitely adding some gold.
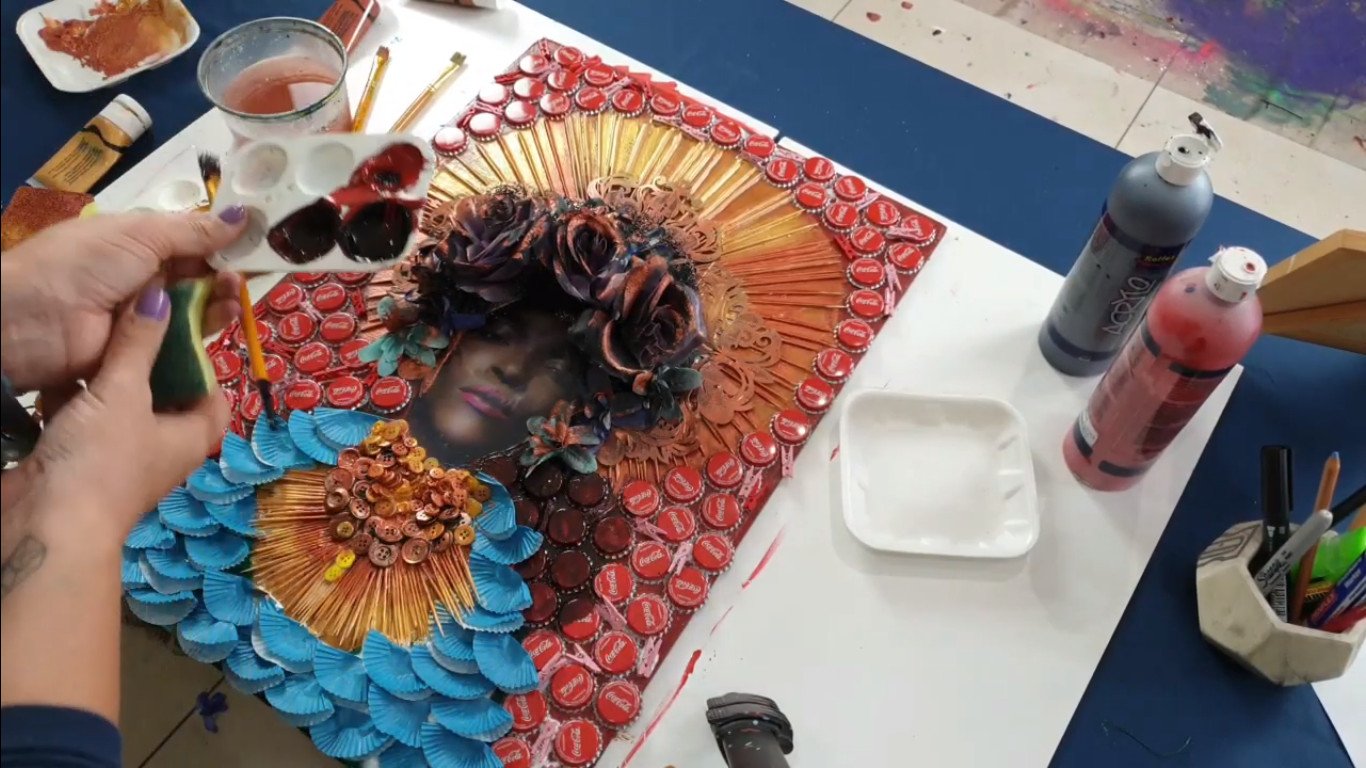
I’m going to be using just the old kitchen sponge now and some paint. Remember less is more. You just want to lightly dust some paint on your subject and this really works well when you guys have got a dark colour. I’ve made my roses dark and now I’m going to put on a light colour.
What I’m going to do, I’ve just wet my sponge a bit and I’m going to start brushing the gold onto my roses. I’m now going to show you how to make your background recede a bit because I really want her to stand out in all her glory. I’m going to make what we call a tint in art so I’m going to be making a much darker red and I’m going to be adding quite a lot of water, so that it really, really drips a lot, and runs a lot.
The reason is I wanted to get into all these little crevices. I am going to plan this quite well in my head. I’ve worked out exactly where I want my darks to be. I do not want to cover all these coke lids that are not the idea. The idea is just to really make my figure stand out, so you want the darks to go into the area and all the little cracks.
I’ve decided the area next to her is going to be darkest and then her radiant light is going to come from a crown and move out. You can work into the little cracks with a brush. Be careful not to get paint onto areas that you don’t want them, and then while it’s still wet, so just do a little section at a time you can sponge down the area so you can still see the coke. I just want the coke to lightly fade out.
I’m done brushing with my paint but, I really love adding the tints and the darks and the lights because this guides the viewer to what is important and where to focus, because collages can be very overwhelming and extremely busy. And you need to decide as the artist what is the most important area. I’m just going to do the last few things that I think this needs. I don’t like this sharp edge here so I’m just going to add some smaller flowers over there and round that off and make sure I’m hundred percent happy
Hi guys, that concludes our mixed media lesson. I hope you guys are going to have lots of fun with this project.

Check out our air-dray clay penguin video, as well as the chicken video. Go to our blog to find some more amazing art projects.
This is Lillian Gray, South African fine artist and owner of the Lillian Gray Fine Art school.
Please remember to subscribe and stay tuned for more creative projects.